1935 Chevy school bus
Moderator: TMAX
Re: 1935 Chevy school bus
Fab Fabbing!
-
Lostranger

- Posts: 335
- Joined: Fri May 14, 2010 2:49 am
- Location: North Carolina
- Contact:
Re: 1935 Chevy school bus
That's beautiful, Jack. Is it 18g cold rolled?
Re: 1935 Chevy school bus
Hello All. First off, no, Lostranger, it is 22 ga since all it has to do is contain carbon dioxide. I did however, use 22 ga for the exterior sheet metal as it is stronger and easier to work without fear of oil canning.
As some of you have discovered, I like to make mock-ups as I go along. This often includes measurement such as temp and air flow. A while back I determined that I could take a "navy" shower with one gallon of water ( my shower stall in the house is the same size as the bathroom/shower in the bus. All I needed was a watch, a 5 gal bucket and a thermometer to figure this out). That info led me to the Ecotemp L5 instant water heater I am using as it produces 1.4gpm. The thing about "navy" showers is that it is real cold between wet down and rinse off. I stumbled over a small (4"X4"X4" 1500watt electric heater with fan earlier this week. Today I rigged up the heater at the base of the house shower stall and observed the heat rise in the stall. The temp rose from 65 degrees F to 80 degrees F in a mater of seconds. So far so good. Tonight I set the house shower water flow and temp to 1 gpm and 100 degrees F and jumped with my thermometer. I took a luxurious shower while I watched the air temp rise in the shower stall. When I could no longer enjoy the shower I checked the stall air temp and found it to be 85 degrees F. These findings have convinced me to build the little forced air heater into the bus shower stall to combat the chill between wet down and rinse off. Although I'll have to run my little 3000 watt Yamaha generator to power the heater, the genny will run for about 45 hours on its 8 gal tank of fuel and I'll be well out of water long before that so I might as well be comfy. Jack
As some of you have discovered, I like to make mock-ups as I go along. This often includes measurement such as temp and air flow. A while back I determined that I could take a "navy" shower with one gallon of water ( my shower stall in the house is the same size as the bathroom/shower in the bus. All I needed was a watch, a 5 gal bucket and a thermometer to figure this out). That info led me to the Ecotemp L5 instant water heater I am using as it produces 1.4gpm. The thing about "navy" showers is that it is real cold between wet down and rinse off. I stumbled over a small (4"X4"X4" 1500watt electric heater with fan earlier this week. Today I rigged up the heater at the base of the house shower stall and observed the heat rise in the stall. The temp rose from 65 degrees F to 80 degrees F in a mater of seconds. So far so good. Tonight I set the house shower water flow and temp to 1 gpm and 100 degrees F and jumped with my thermometer. I took a luxurious shower while I watched the air temp rise in the shower stall. When I could no longer enjoy the shower I checked the stall air temp and found it to be 85 degrees F. These findings have convinced me to build the little forced air heater into the bus shower stall to combat the chill between wet down and rinse off. Although I'll have to run my little 3000 watt Yamaha generator to power the heater, the genny will run for about 45 hours on its 8 gal tank of fuel and I'll be well out of water long before that so I might as well be comfy. Jack
Re: 1935 Chevy school bus
Hello All. All the cutting and grinding and welding and painting seems to have paid off. My POS HF compressor is back on line and works just fine. I hope the paint I applied to the inside keeps the rust at bay--time will tell.
I completed the mods to the water heater vent window so now there is convection cooling as well as exhaust. I decided to use the unused lower 15" of the heater cover as a place to mount the water pumps--one for hot water and the other for cold. Both pumps came with rubber vibration islolaters which I attached to a square of 1/2" thick rubber mat and then bolted the mat to a rigid bracket. I used steel braided water lines to and from the pumps and water heater which also allow for vibration and movement of the pumps. I think that by the time I get the heater/pump cover covered with carpet, I won't be able to hear or feel the pumps running.
Hop scotch starts again. Before I can complete the water system I have to weld on the LR replacement body panel as the various shut off valves I need would preclude that later on so I am now back to doing body work. Jack
The water heater/pump cover is complete and installed.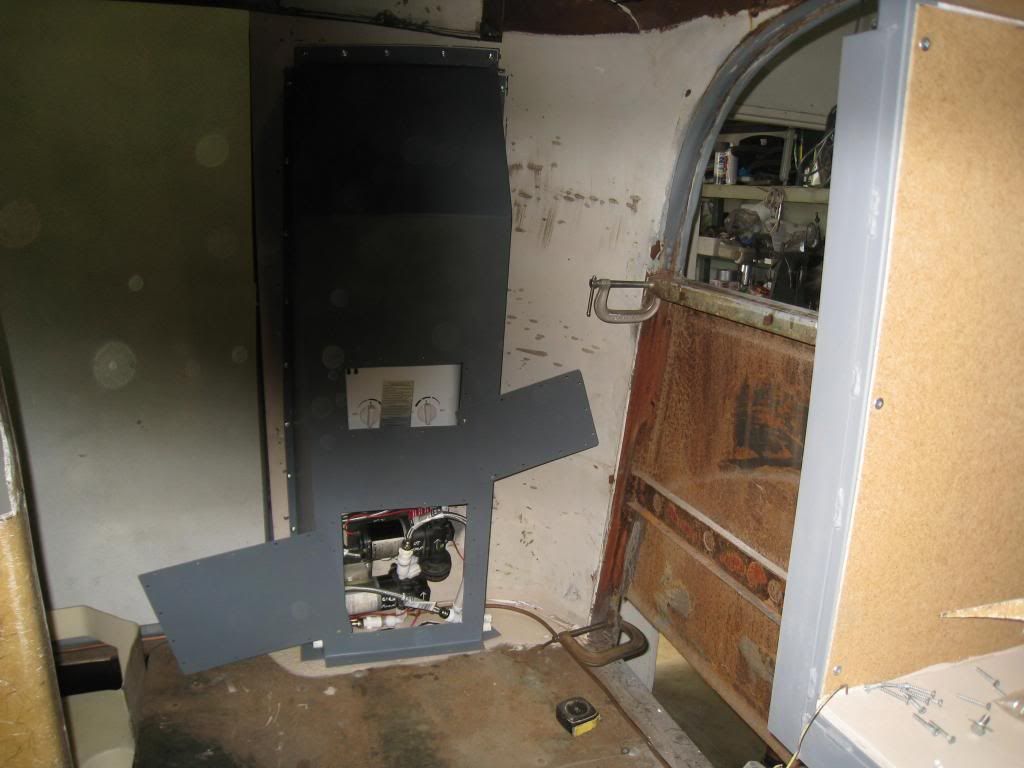
Close up pic of the water pumps in their new home.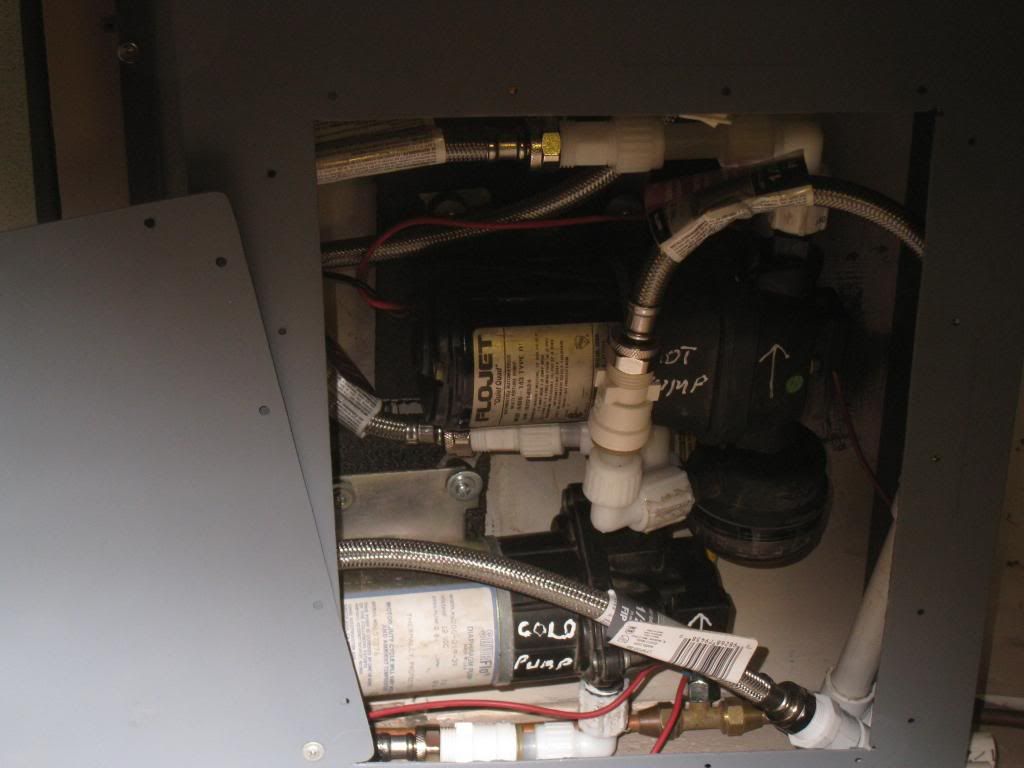
I completed the mods to the water heater vent window so now there is convection cooling as well as exhaust. I decided to use the unused lower 15" of the heater cover as a place to mount the water pumps--one for hot water and the other for cold. Both pumps came with rubber vibration islolaters which I attached to a square of 1/2" thick rubber mat and then bolted the mat to a rigid bracket. I used steel braided water lines to and from the pumps and water heater which also allow for vibration and movement of the pumps. I think that by the time I get the heater/pump cover covered with carpet, I won't be able to hear or feel the pumps running.
Hop scotch starts again. Before I can complete the water system I have to weld on the LR replacement body panel as the various shut off valves I need would preclude that later on so I am now back to doing body work. Jack
The water heater/pump cover is complete and installed.

Close up pic of the water pumps in their new home.

-
Lostranger
- Posts: 335
- Joined: Fri May 14, 2010 2:49 am
- Location: North Carolina
- Contact:
Re: 1935 Chevy school bus
Lovely as always, Jack. Looking forward to seeing the body work. I need inspiration to get back on my door. It needs lots of shrinking, plug welding, straightening, grinding, filling and so forth. Got the permanent bed installed yesterday, but everywhere I look, something screams for attention. It's 32 here this morning, so that means the wood stove gets moved to the top of the list.
I'd never thought of using separate pumps for hot and cold. What's your thinking on that one?
Jim
I'd never thought of using separate pumps for hot and cold. What's your thinking on that one?
Jim
-
Mark R. Obtinario
- Seasoned Nomadicista
- Posts: 340
- Joined: Mon Jun 13, 2005 12:19 am
- Location: Winlock, WA
- Contact:
Re: 1935 Chevy school bus
I like the fact you labeled everything with direction arrows.
I always say I will remember but I never do if it was any length of time since the last time.
I just wish I had a smidgeon of your talent and skill set. I am not bad at rough stuff but finish work of any kind is just not in my skill set.
I could no more do some of the sheet metal work you have done or the instrument work Lostranger has done than I could flap my arms and fly.
I don't know if I feel intimidated or inspired.
Keep up the good work both of you!
Re: 1935 Chevy school bus
Hello All. Mark, thank you for the kind words. Jim, my thinking on the two water pumps grew out of two concerns. First, the heater requires at least one gallon/min flow before it will light off and second since I will recirculate the hot water between uses (like wet down to soap up and then rinse off) I don't want the pressure or flow rate to change as it relates to the water heater. This will also make for instant hot water at the tap when I actually use water. I plan to use the cold pump in the usual way.
I got the final replacement panel installed on the left side of the bus today along with a little body work on the LR corner. Now I'll be able to return to building the water system since it won't be blocking anything. Jack
This is where I started today.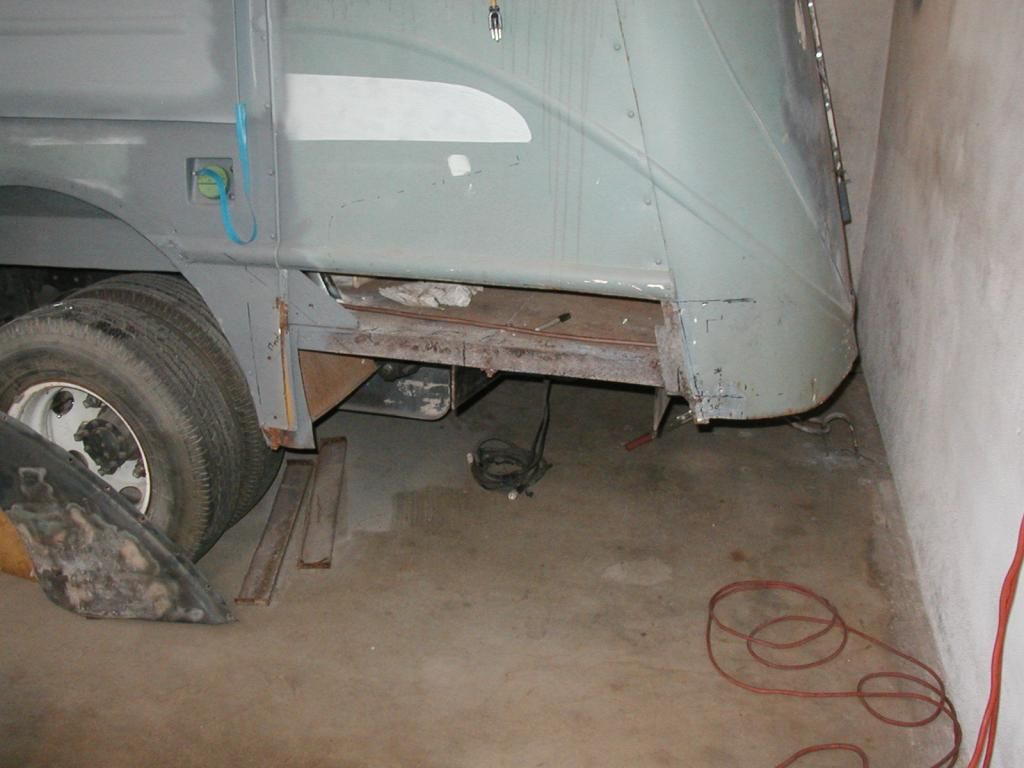
All of the original lower body panels were alike on the side of the bus. This meant that about 9" of panel hung below the rear bumper. I decided to tilt the rear panel up at the rear so that it lines up with the bumper better. I'll have to modify the bottom rear edge of the rear fender to make it fit but I'd be fixing it anyway because it was rusty so no big deal.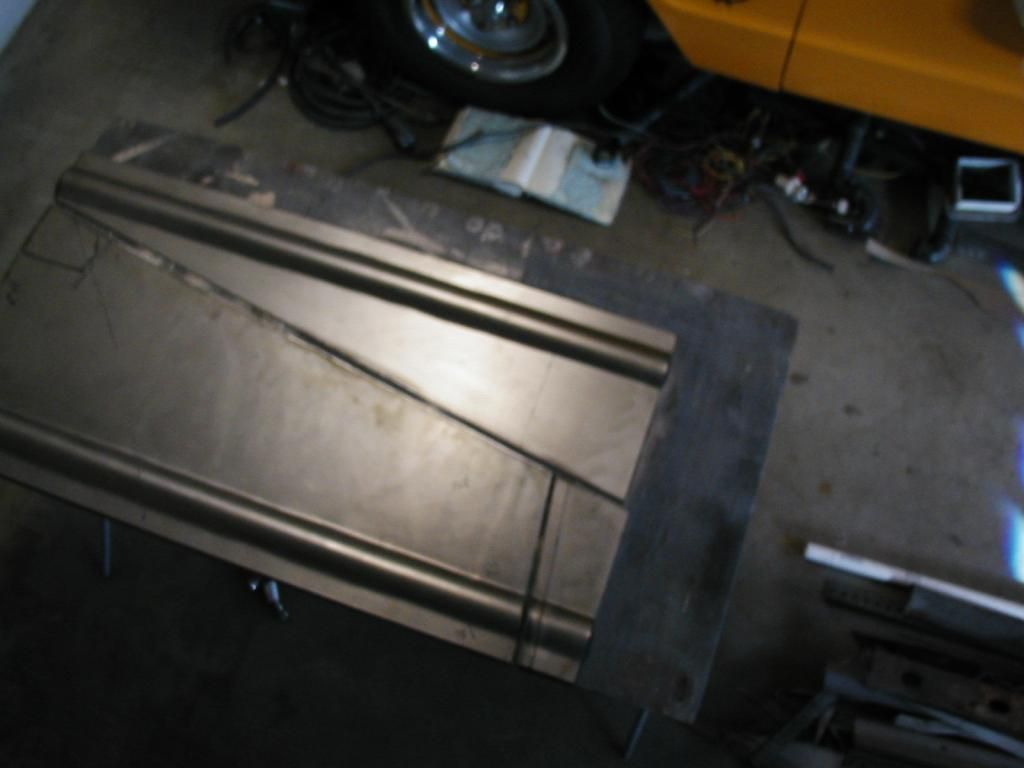
Trial fit of the rear panel. At this point I made up a new bumper bracket to match the new panel.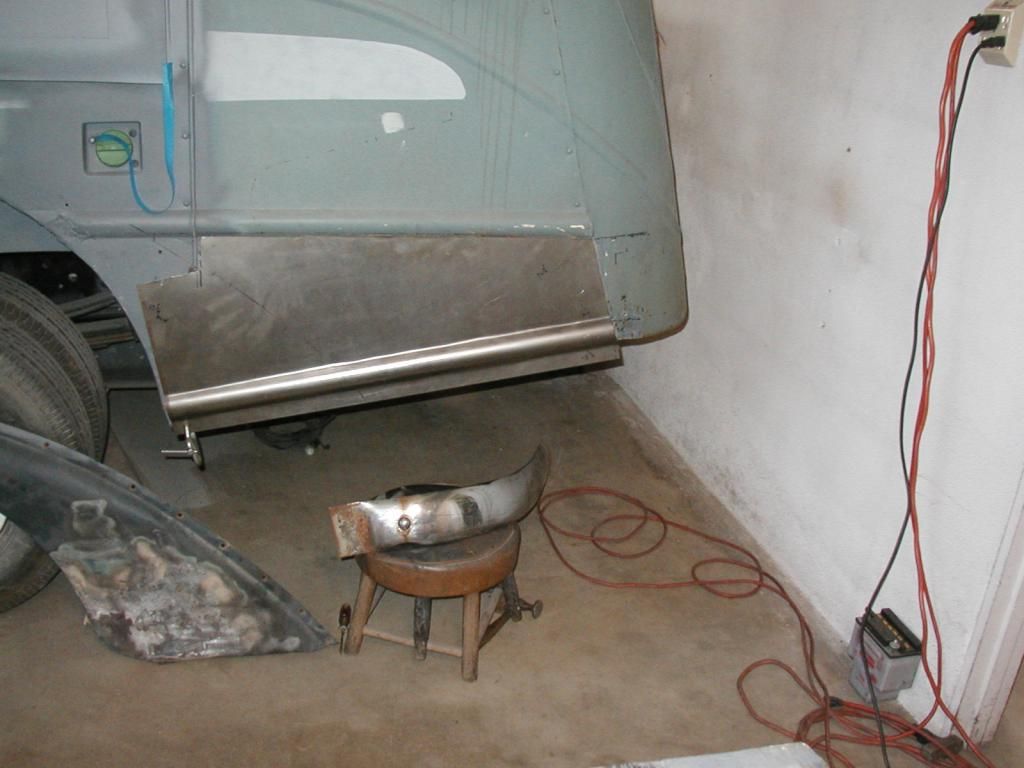
Finally finished the project up early this evening.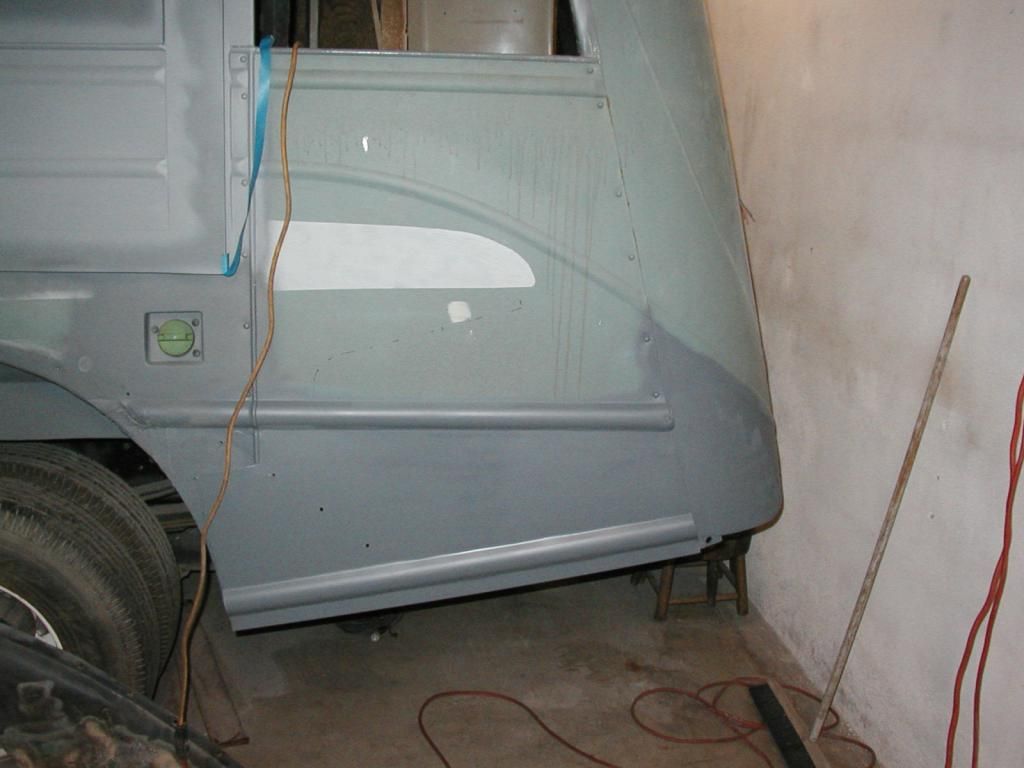
I got the final replacement panel installed on the left side of the bus today along with a little body work on the LR corner. Now I'll be able to return to building the water system since it won't be blocking anything. Jack
This is where I started today.

All of the original lower body panels were alike on the side of the bus. This meant that about 9" of panel hung below the rear bumper. I decided to tilt the rear panel up at the rear so that it lines up with the bumper better. I'll have to modify the bottom rear edge of the rear fender to make it fit but I'd be fixing it anyway because it was rusty so no big deal.

Trial fit of the rear panel. At this point I made up a new bumper bracket to match the new panel.

Finally finished the project up early this evening.

Re: 1935 Chevy school bus
Nice mod Jack --- mine came with a little sweep up to the bumper that I'm going to keep. Wish I had a tiny bit more room behind the rear wheels (like yours) to work with...just not enough to add any on. And I really like the separate hot/cold systems. Outstanding workmanship as always.
BTW...the Bikini Team was heartbroken to hear you can't make it.
BTW...the Bikini Team was heartbroken to hear you can't make it.
Re: 1935 Chevy school bus
Hello All. I added a couple of inches of foam insulation under the windows on the drivers side just behind where the water pipes need to go. Then I built the water manifold that brings water to the two pumps. The only thing that will show after I put the steel cover on are the 2 faucet handles to switch from shore to tank water. I also installed the hot water return solenoid. I still need to plumb the water to both sinks and wire the pumps and solenoid and then I'll be done with the fresh water distribution system. Jack
Since the hot water return is in the top of the tank I added a piece of stainless steel key chain for the return water to follow into the tank. This stops the sound of the "tinkle-torium" as the water returns.
This is a pic of the fresh water manifold which will be hidden behind a steel cover.
This view shows the hot wateer solenoid installed on the top of the tank and the air vent/overflow tube.
Since the hot water return is in the top of the tank I added a piece of stainless steel key chain for the return water to follow into the tank. This stops the sound of the "tinkle-torium" as the water returns.

This is a pic of the fresh water manifold which will be hidden behind a steel cover.

This view shows the hot wateer solenoid installed on the top of the tank and the air vent/overflow tube.

-
Lostranger
- Posts: 335
- Joined: Fri May 14, 2010 2:49 am
- Location: North Carolina
- Contact:
Re: 1935 Chevy school bus
I'm so proud!
Re: 1935 Chevy school bus
Hello All. From the win a few loose a few file----I decided that I just didn't have room to install my 13,000 BTU heat pump without it being imposible to remove for service. Since I do have an R/V heater installed allready I decided to use an 8K BTU room A/C. I bought it on Amazon for $150 and anxiously awaited its arrival. It arrived. The shipping box looked like it had been draged behind a truck from China. I was wrong. It must actually have been drop shipped from UPS air at about 30,000 feet and then rolled to my door! The case was bashed (I could live with that), the cooling fins were flattened (I could live with that), the plastic face plate was broken ( I could live with that--but not happily) and when I powered it up it gave a sigh and (Lucas like) let all the smoke out--I can't live with that! 
Amazon agreed to a return and I sent the thing back. Much to my delight, when I began looking for a replacement I found the exact same unit for $50 less and ordered it--from Amazon again----we'll see....... Jack
Jack
Amazon agreed to a return and I sent the thing back. Much to my delight, when I began looking for a replacement I found the exact same unit for $50 less and ordered it--from Amazon again----we'll see.......
Re: 1935 Chevy school bus
Roger the issues with UPS, I have them far too consistently --- Ya'gotta be suspect of a delivery service whose name is pronounced..."Ooops".
Course I also heard a rumor that FedEx & UPS were gonna merge.
The logo for the new conglomerate is below...
FedUp
.
Course I also heard a rumor that FedEx & UPS were gonna merge.
The logo for the new conglomerate is below...
FedUp
.
Re: 1935 Chevy school bus
Hello All. I'm SO EXCITED! The replacement A/C arrived this afternoon via Fedex and I think the thing is salvageable! Once I got the fans unjambed and the face plate removed the thing works great. The air comming from the vents does so at 20 degrees F--no rattle, no wheezing and best of all NO SMOKE! Despite having been double boxed this time, the case is quite bashed up but I'll just do a little "body work" and call it good. Now I have a new project to start on tomorrow! Jack
The replacement A/C never made it past the entry to the livingroom before I had it torn apart .
The replacement A/C never made it past the entry to the livingroom before I had it torn apart

Re: 1935 Chevy school bus
Hey Jack --- Looking forward to watching how you handle the installation. I went with a small window unit myself. The new ones are quite efficient, small and the whole thing can be replaced in minutes at any Wally World for a fraction of what the typical RV shop would charge just to "look at" most roof-airs.
Re: 1935 Chevy school bus
Hey Tango and all, Tango, If I remember right you were planning on a pop out above the rear door to fit the a/c into--and that seems sensible. I have the pop out but have to use it for head (mine) room in the head so the a/c had to go somewhere else. I don't want the a/c box hanging out the side of the bus so I am trying to mount the whole thing inside with ducting through the floor for the condensor. I've been playing with a cardboard mock up and I think the a/c will end up high up at the right rear corner of the bus stuffed in behind the bathroom sink and the last rear side window. I'll position it at about 45 degrees from the outside wall over the kitchen counter just aft of the stove. It looks like the microwave oven should fit directly below the a/c and the counter top--also at a 45 degree angle. Because of the location of the bathroom at the center rear of the bus, the right rear corner of the bus sort of became no man's land so I decided to try and stuff the a/c and it's ducting there. Maybe I'll still be able to make a small storage locker (accessable from outside) from the left over space.
Another topic: I made up a "hall way switch " set up for thr recirculating hot water system so that it could be controlled at either the bath or kitchen--that works fine. I incorporated a couple of LED lamps as guide lamps so that one would know either in the kitchen or the bath that the solenoid shunt (back to the water tank) was on. The guide lamps were rated for 12 volts (AC or DC who knows) and came with built in resistors etc. They worked fine for a day and then both gave up the ghost. I am aware that you can screw up LEDs by reversing polarity--but I didn"t do that---unless---. I noticed while checking the voltage on the solenoid that when you cut power to the solenoid, the voltage measured shows a progression to zero. That doesn't happen with say a DC motor or lamp--the voltage just stops. Is it possible that the solenoid is acting like a capacitor and storing energy which is released when the solenoid goes to rest? If so, could this energy look to the LED like reversed polarity thereby causing LED failure????? I posed this question to the guys at the local Fry's Electronics where I bought the LEDs and got my favorite response--deer in the headlamps. anyone have a thought on this? Thanks, Jack
Another topic: I made up a "hall way switch " set up for thr recirculating hot water system so that it could be controlled at either the bath or kitchen--that works fine. I incorporated a couple of LED lamps as guide lamps so that one would know either in the kitchen or the bath that the solenoid shunt (back to the water tank) was on. The guide lamps were rated for 12 volts (AC or DC who knows) and came with built in resistors etc. They worked fine for a day and then both gave up the ghost. I am aware that you can screw up LEDs by reversing polarity--but I didn"t do that---unless---. I noticed while checking the voltage on the solenoid that when you cut power to the solenoid, the voltage measured shows a progression to zero. That doesn't happen with say a DC motor or lamp--the voltage just stops. Is it possible that the solenoid is acting like a capacitor and storing energy which is released when the solenoid goes to rest? If so, could this energy look to the LED like reversed polarity thereby causing LED failure????? I posed this question to the guys at the local Fry's Electronics where I bought the LEDs and got my favorite response--deer in the headlamps. anyone have a thought on this? Thanks, Jack
Who is online
Users browsing this forum: No registered users and 32 guests