1935 Chevy school bus
Moderator: TMAX
Re: 1935 Chevy school bus
WAY COOL Tango! 
Re: 1935 Chevy school bus
Hello All. I just got a new Cannon scanner and to my surprise I've managed to scan something, save it to my computer, AND send it to PB!
While I love my $2 NOS touch/touch latches, by the time I got them installed I decided I'd have to charge someone else at least $150 a latch to do it for them. Only took me two days to install 4 latches. I suppose I shouldn't complain and it is true these very same latches have been working flawlessly in my nearly 70 year old house, but what if one of them jambs on a cupboard/drawer in the bus--the one with the electrical short behind it etc. etc. Hence the two days. I can now open any adjacent cupboard or drawer from the one next to it. Except for the one that has no neighbor. That one does have a malt cup embedded in its counter top. Perfect. Remove the malt cup, stick your hand in the hole, remove a bolt. push a lever arm. drop the arm and suddenly the cupboard will pop open. Rube Goldberg would have been proud of me.
  Needless to say, the draft drawing of this contraption is what I scanned--turns out that it works.
I know I can't spell and this proves that I can't draw either.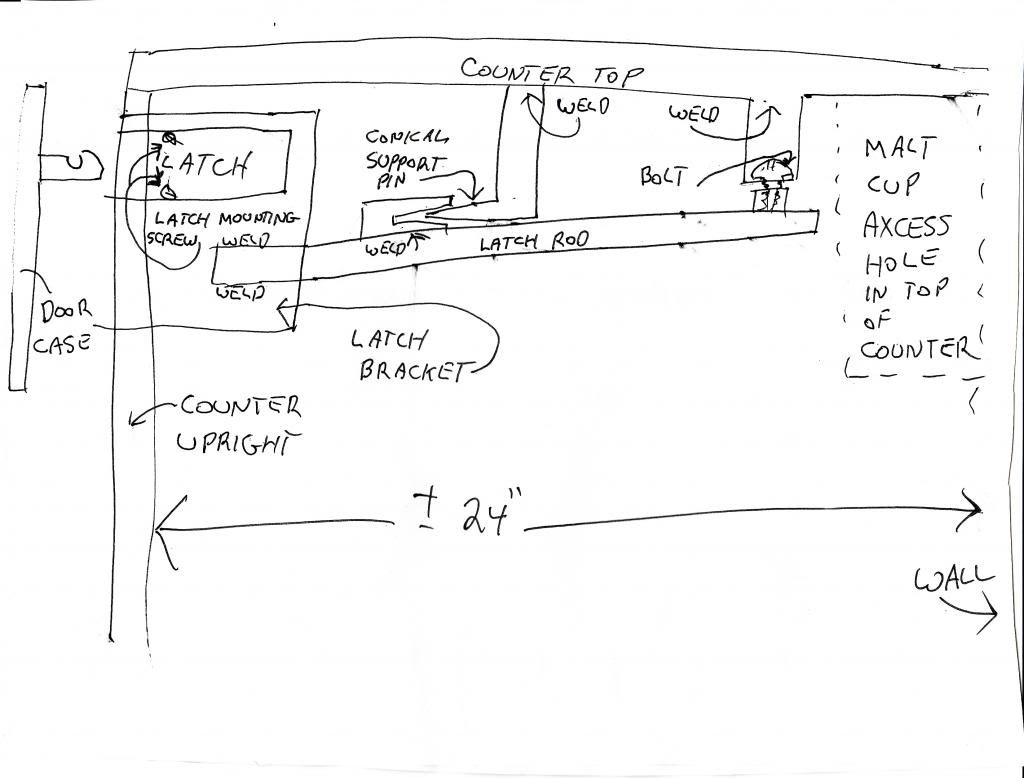 [/]
[/]
View of completed latch.
View of "pin".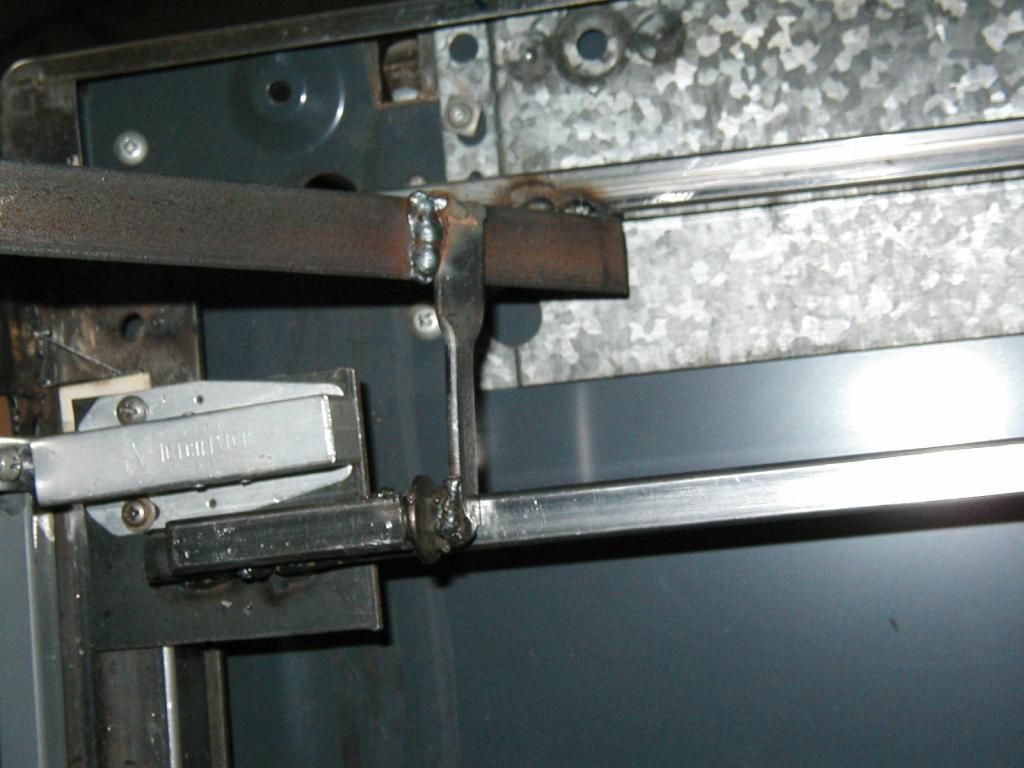
View of bolt below malt cup.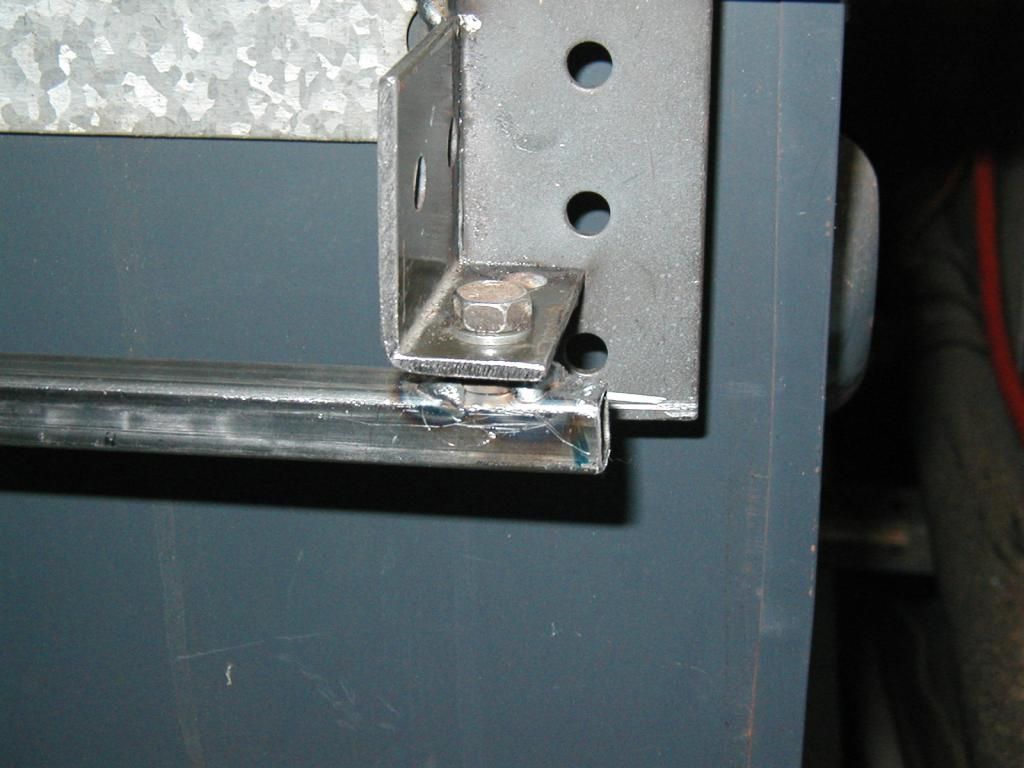 [/]
[/]
There are a couple of other goofy design at work but you get the idea. Jack
While I love my $2 NOS touch/touch latches, by the time I got them installed I decided I'd have to charge someone else at least $150 a latch to do it for them. Only took me two days to install 4 latches.
I know I can't spell and this proves that I can't draw either.
 [/]
[/]View of completed latch.

View of "pin".

View of bolt below malt cup.
 [/]
[/]There are a couple of other goofy design at work but you get the idea. Jack
Re: 1935 Chevy school bus
Gotta Love that Rube Goldburg, and he would indeed be proud! --- And, leave it to Jack to find a highly technical work-around to the simplest and most obvious solution...
just let dwarves live inside the cabinets and have them unlatch as needed.
just let dwarves live inside the cabinets and have them unlatch as needed.
Re: 1935 Chevy school bus
Hello All. Its been a while since I posted an update--due to the fact that I didn't have anything to show for my work until today. While I'm reasonably happy with my results, I would not recommend using Formica as a surface for cabinets made of welded steel tubing. Although the tubing makes a strong and light weight counter. cutting and fitting and gluing etc the Formica was a tedious and frustrating endeavor and unless you are blessed with a love of differed gratification don't EVEN go there.
I still have about a half a sheet of Formica left and I'll probably feel compelled to use it somewhere in the bus--perhaps as toe plates on the stair well or as a surface for an attachable outdoor table. At $115 a sheet I doubt wiffy would be too happy seeing it in the scrap pile. Jack
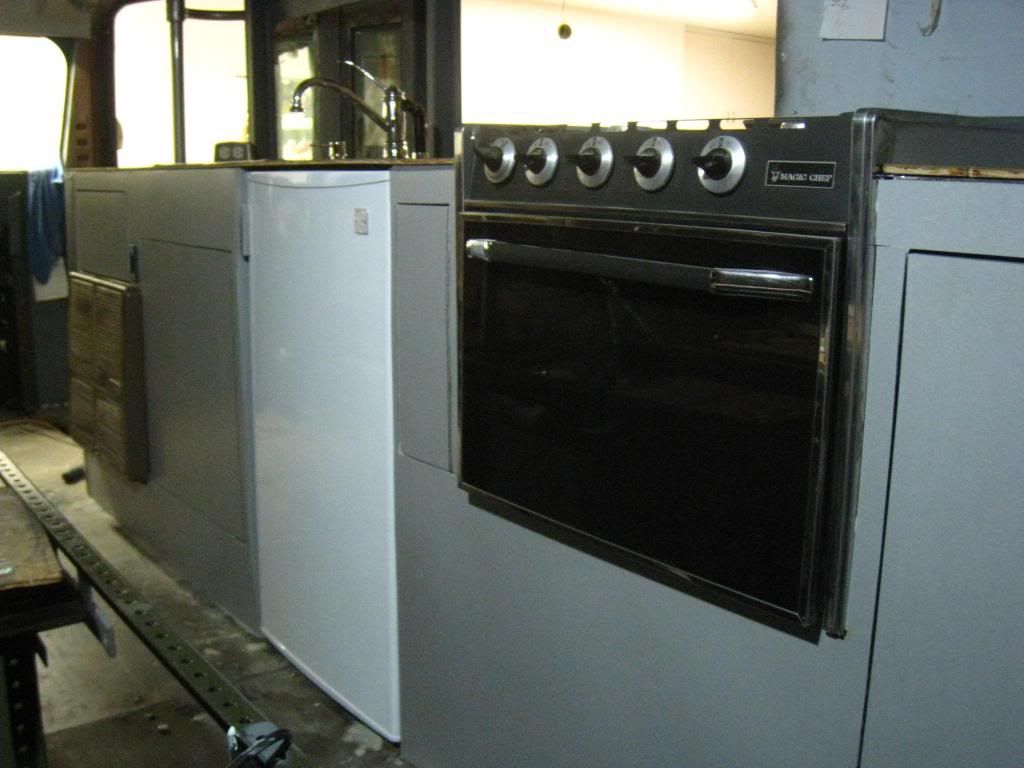
These are some pics of the final trial fit of the various parts. The edge trim is missing but I already knew it fit.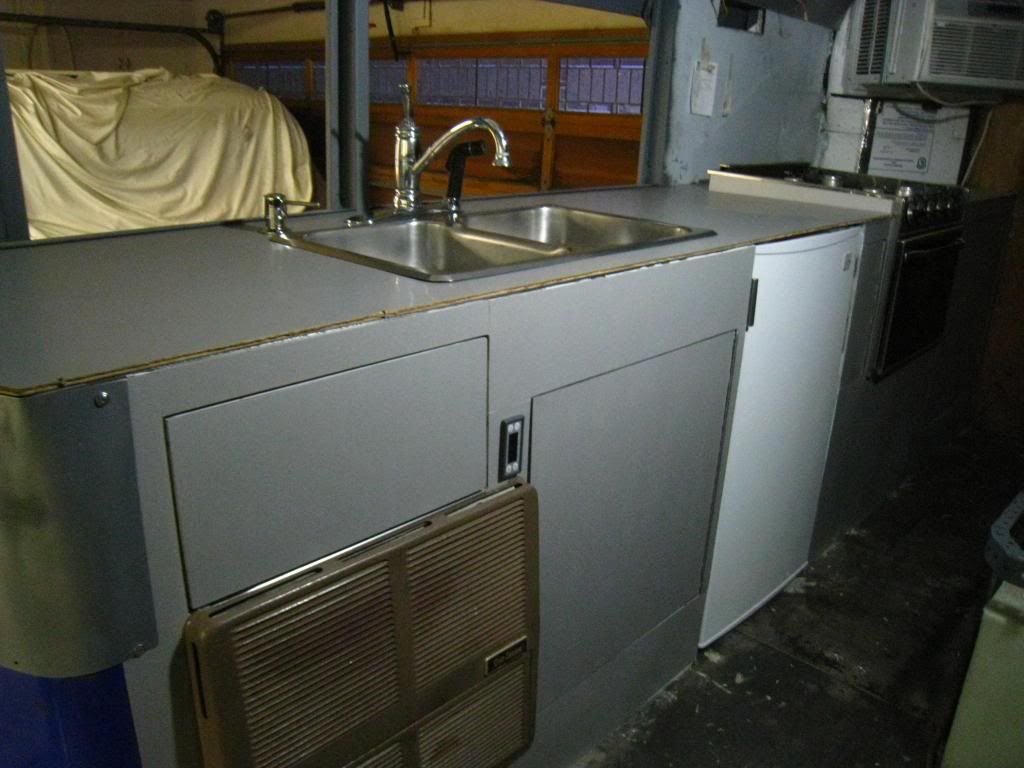
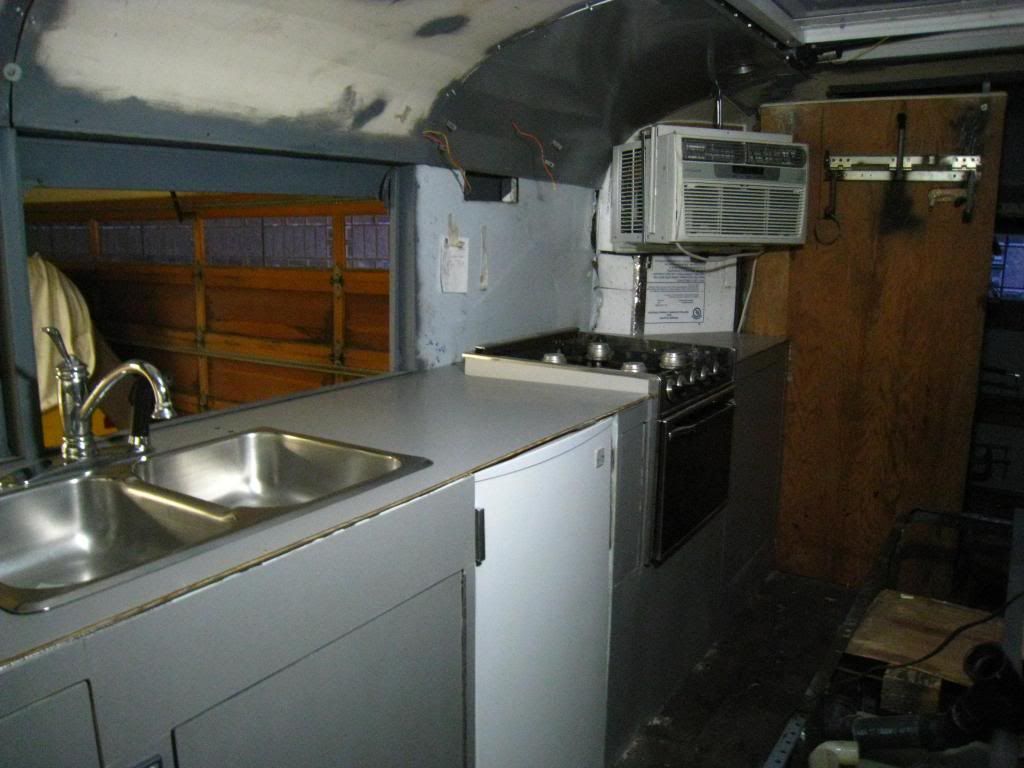
High tec method for sanding pieces of Formica until they finally fit . 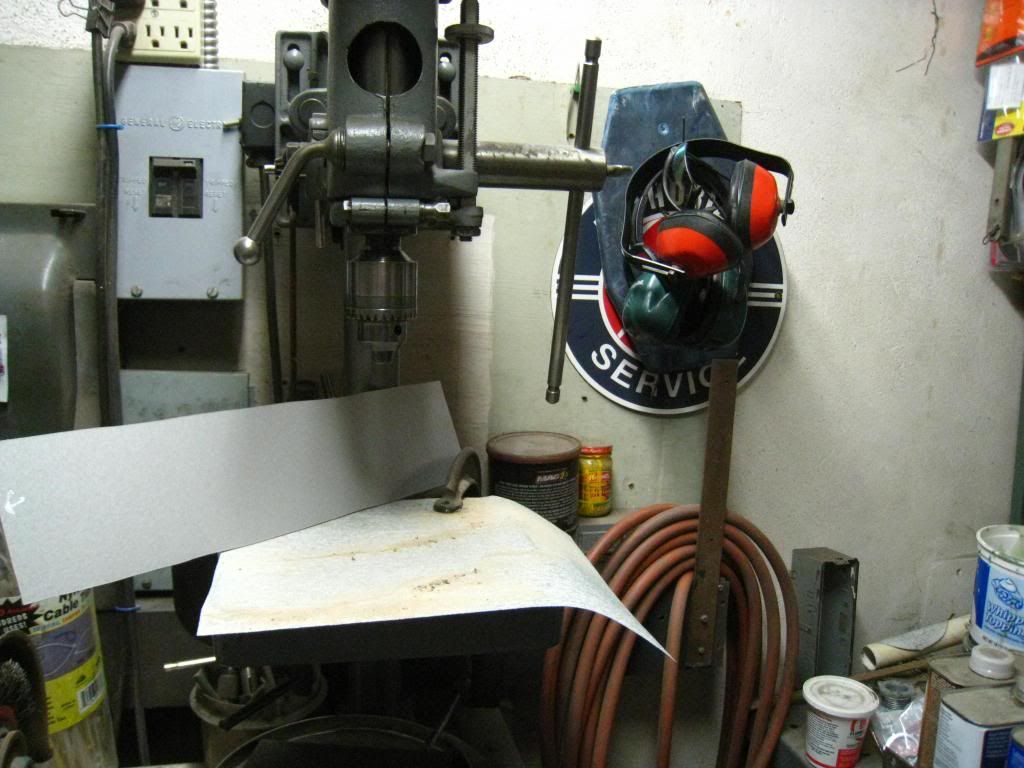
I still have about a half a sheet of Formica left and I'll probably feel compelled to use it somewhere in the bus--perhaps as toe plates on the stair well or as a surface for an attachable outdoor table. At $115 a sheet I doubt wiffy would be too happy seeing it in the scrap pile. Jack
These are some pics of the final trial fit of the various parts. The edge trim is missing but I already knew it fit.


High tec method for sanding pieces of Formica until they finally fit

-
somewhereinusa

- Posts: 323
- Joined: Sat Feb 12, 2011 2:44 pm
- Location: Andrews, Indiana
- Contact:
Re: 1935 Chevy school bus
As always, Jack, nice work. What are we actually looking at in that last picture? Something in the chuck?
I can't wait to get going again as soon as we get over this worst winter since I was born thing. It's actually supposed
to get above freezing by the end of the week.
I can't wait to get going again as soon as we get over this worst winter since I was born thing. It's actually supposed
to get above freezing by the end of the week.
Re: 1935 Chevy school bus
Hey somewhere. If Santa had brought me the new camera I had asked for instead of the kidney stones he brought, you'd have been able to see that the high tech I was referring to is really only a piece of sandpaper clamped to the plate of my little drill press. I used the plate and sand paper to square up the bits of Formica since I had to make the cuts with a hand held jig saw and they were anything but straight.. Jack
Re: 1935 Chevy school bus
Outstanding work! (as we all expected) --- It appears from the pix that you used a very thin substrate to face the cabinets and for the counter top. With the framework being metal, what is the Formica attached to?
Re: 1935 Chevy school bus
Hey Tango, the Formica was glued to 1/4" plywood on the counter top. The door frames (and the rest of the framing actually) is 1/2" square tubing. I glued plywood to all but about 3/4" around the edge of the Formica pieces destined for the counter front and then attached the sandwich directly to the tubing using the Evercoat product shown below thereby bonding the perimeter of the Formica directly to the steel frame. As usual I did a test of the materials to see what worked for bonding and Evercoat held very tightly.
While I'm talking about Evercoat I should say that it has proved to be the best body filler I've found yet--it doesn't have the typical sticky finish after curing like most other fillers do. Jack
The contact cement is water based and works just so so. The Evercoat product is great.
While I'm talking about Evercoat I should say that it has proved to be the best body filler I've found yet--it doesn't have the typical sticky finish after curing like most other fillers do. Jack
The contact cement is water based and works just so so. The Evercoat product is great.

Re: 1935 Chevy school bus
She's coming together beautifully Jack. Nice clean look.
I've tried a bunch of water-based-stuff-that's-supposed-to-replace-evil-oil-based-stuff. Screw the EPA, almost all of it sucks.
I've tried a bunch of water-based-stuff-that's-supposed-to-replace-evil-oil-based-stuff. Screw the EPA, almost all of it sucks.
Re: 1935 Chevy school bus
Thanks Jack --- I figured your fix was not the usual 3/4 ply and Formica.
Re: 1935 Chevy school bus
Hello All. I feel like I'm playing hop scotch again. I'd like to have continued with the construction of the interior but there were still items to complete on the outside that needed to be done before I paint the hammer tone grey on the inside. Chief among these was the completion of preping the roof for paint and some body work on the sides.
The paint history on my bus included a sand blast of the original SBY followed by a coat of catalytic primmer done in the late 60's. Next came a two tone paint brush job using latex house paint sometime in the early 70's and finally another coat of latex house paint applied by airless sprayer in preparation for the making of the movie "Topaz" in 1987. While all this paint kept the bus from rusting away it sure is making it hard to prep for a new automotive finish--especially the brush strokes which have to be sanded and filled to rid the finish of its corduroy look.
The second thing I wanted to complete was the finish on the blocked out windows.. I color matched the silver green tint found on the obscure window glass I had made for the bathroom and using a base coat clear coat combination matched the blocked out windows to the real window--a scared Nun trying to get out of the cross walk will hardly even notice the difference . Jack
Latex paint is very hard to sand and gums up the sand paper very quickly. Anyone contemplating a "real" paint job at a later date would be well advised to stay clear of latex paint.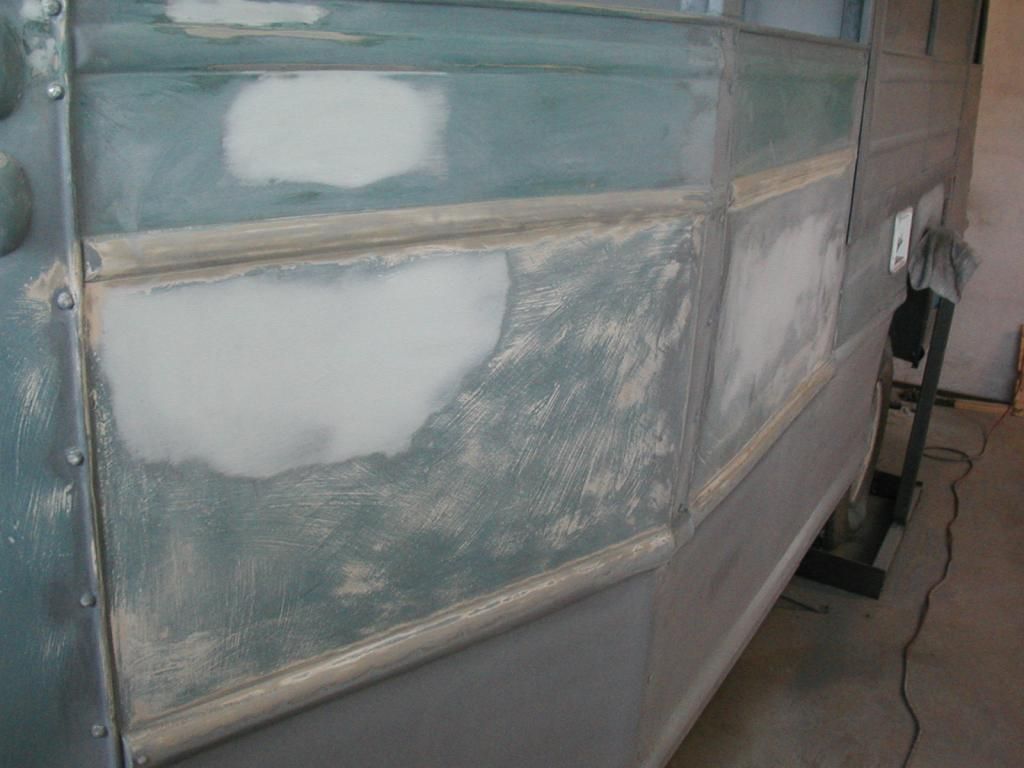
My cheapie camera doesn't do justice to the effect given by the fake windows--they really look like obscure glass (the 1/4 round is real glass).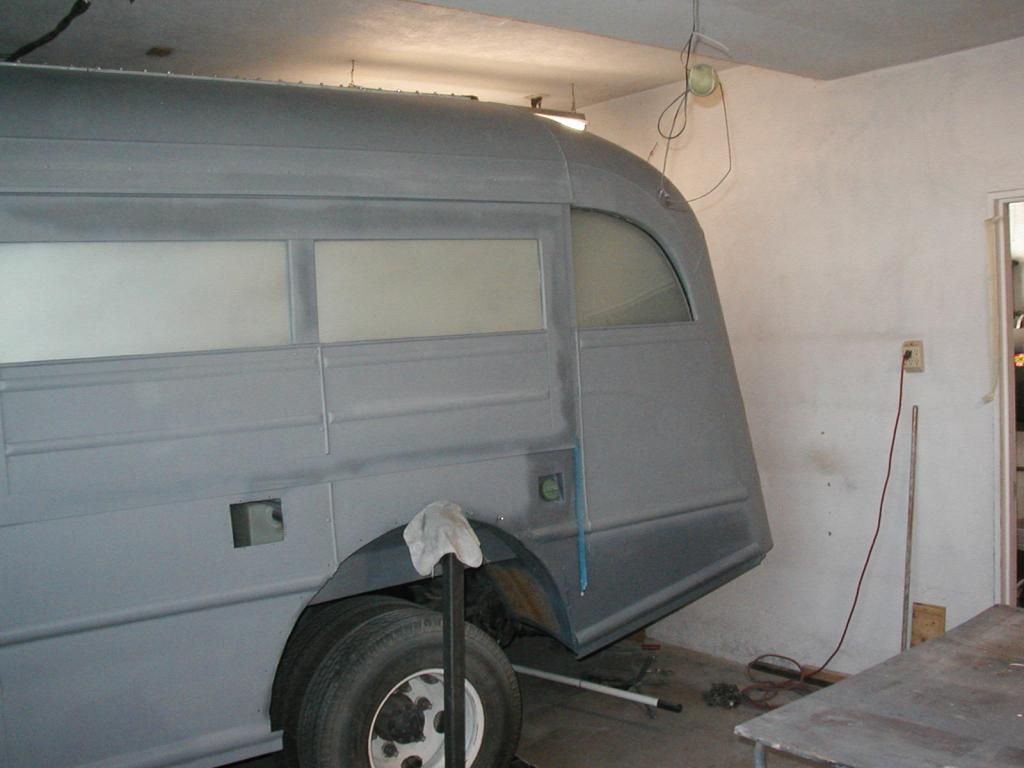
The paint history on my bus included a sand blast of the original SBY followed by a coat of catalytic primmer done in the late 60's. Next came a two tone paint brush job using latex house paint sometime in the early 70's and finally another coat of latex house paint applied by airless sprayer in preparation for the making of the movie "Topaz" in 1987. While all this paint kept the bus from rusting away it sure is making it hard to prep for a new automotive finish--especially the brush strokes which have to be sanded and filled to rid the finish of its corduroy look.
The second thing I wanted to complete was the finish on the blocked out windows.. I color matched the silver green tint found on the obscure window glass I had made for the bathroom and using a base coat clear coat combination matched the blocked out windows to the real window--a scared Nun trying to get out of the cross walk will hardly even notice the difference
Latex paint is very hard to sand and gums up the sand paper very quickly. Anyone contemplating a "real" paint job at a later date would be well advised to stay clear of latex paint.

My cheapie camera doesn't do justice to the effect given by the fake windows--they really look like obscure glass (the 1/4 round is real glass).

Re: 1935 Chevy school bus
Hey Jack --- you are so far ahead of me that even if I won the state lottery I couldn't catch up. Lookin' great my friend. And I absolutely agree...no matter what the EPA & Detroit tell you...water-based paint on steel is just plain stupid. Even with the best technology trying to make it work, there are brand new cars still on the lot that have rust popping through. My bus had been stripped in some areas and latex applied. Full layer of rust under every one of them. The areas that still had the 70 year old enamel were bright and clean.
About the only progress I have made in months is to locate a few parts. I did, however, just send a new layout to the local sheet metal shop for my rear wheel cutout panels. Now all I need is a couple of years clear to work on the danged thing. Just wish you'd hurry up and finish yours so you can come down to Texas and park it next to my shop while you work on mine.
About the only progress I have made in months is to locate a few parts. I did, however, just send a new layout to the local sheet metal shop for my rear wheel cutout panels. Now all I need is a couple of years clear to work on the danged thing. Just wish you'd hurry up and finish yours so you can come down to Texas and park it next to my shop while you work on mine.
Re: 1935 Chevy school bus
Hello All. After another week of sanding I have managed to get the top, sides and back of the bus into the final primer stage. I'll let the primer dry for a few weeks before I try to do the final block sanding thereby avoiding paint shrinkage after blocking and avoiding yet another priming.
I turned the bus around again so I could paint the "glass" on the passenger side and rear door. I am still very pleased with the effect although I don't know how they will play with the real windows.
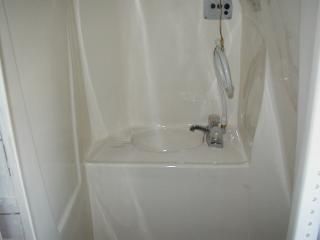
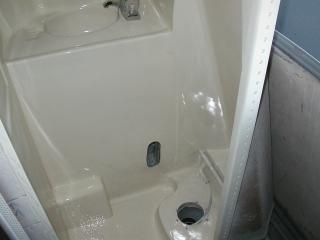
I am now back working on the interior again for a bit. I completed the refinish of the bathroom. I used a two part industrial paint which cured to a hard and shinny finish and with a little care should wear pretty well. I spent today working on the enclosure for the base of the bed. I had rounded the corners of the bed frame where it meets the walkway and continued the round from the top of the frame to the floor to reduce toe stubbing etc. Once again I found myself standing in the hot shower thinking about the bus when it occurred to me that I probably could use a section of 3' heater duct to base the bull nose round upon. I paid a visit to Home Despot and bought a section of duct--the kind that is pre-bent that you close together to latch and made the rounds from that. It was faster and cheaper than buying sheet metal and rolling it myself. With the corners completed I next made faux stainless steel panels to complete the enclosure.
I'll probably spend the weekend doing paint work on the interior--or maybe I'll work on the flooring--we'll see! Jack

Enclosure for bed with bull nose corners .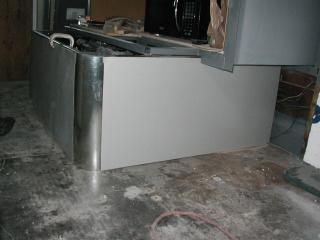
I turned the bus around again so I could paint the "glass" on the passenger side and rear door. I am still very pleased with the effect although I don't know how they will play with the real windows.
I am now back working on the interior again for a bit. I completed the refinish of the bathroom. I used a two part industrial paint which cured to a hard and shinny finish and with a little care should wear pretty well. I spent today working on the enclosure for the base of the bed. I had rounded the corners of the bed frame where it meets the walkway and continued the round from the top of the frame to the floor to reduce toe stubbing etc. Once again I found myself standing in the hot shower thinking about the bus when it occurred to me that I probably could use a section of 3' heater duct to base the bull nose round upon. I paid a visit to Home Despot and bought a section of duct--the kind that is pre-bent that you close together to latch and made the rounds from that. It was faster and cheaper than buying sheet metal and rolling it myself. With the corners completed I next made faux stainless steel panels to complete the enclosure.
I'll probably spend the weekend doing paint work on the interior--or maybe I'll work on the flooring--we'll see! Jack


Enclosure for bed with bull nose corners .

Re: 1935 Chevy school bus
Lookin' Sweet Jack --- I'll repeat my offer for you to come down and help wrap up my project. Feel free to jump in anytime.
Re: 1935 Chevy school bus
Hello All. I got a little work done on the flooring. I'm using 5mm underlayment to level out the floor which has many rivets dotting its surface. I cut out floor sections, dabbed paint on the top of the rivets, pressed the sections onto the floor and like magic I knew just where I had to drill (cut) relief holes. Once all the sections are screwed down I'll go back and fill the cutouts and sand the floor smooth. I should get a nice level sub floor upon which to glue the roll goods I plan to use for the final flooring. Jack
Paint on rivets.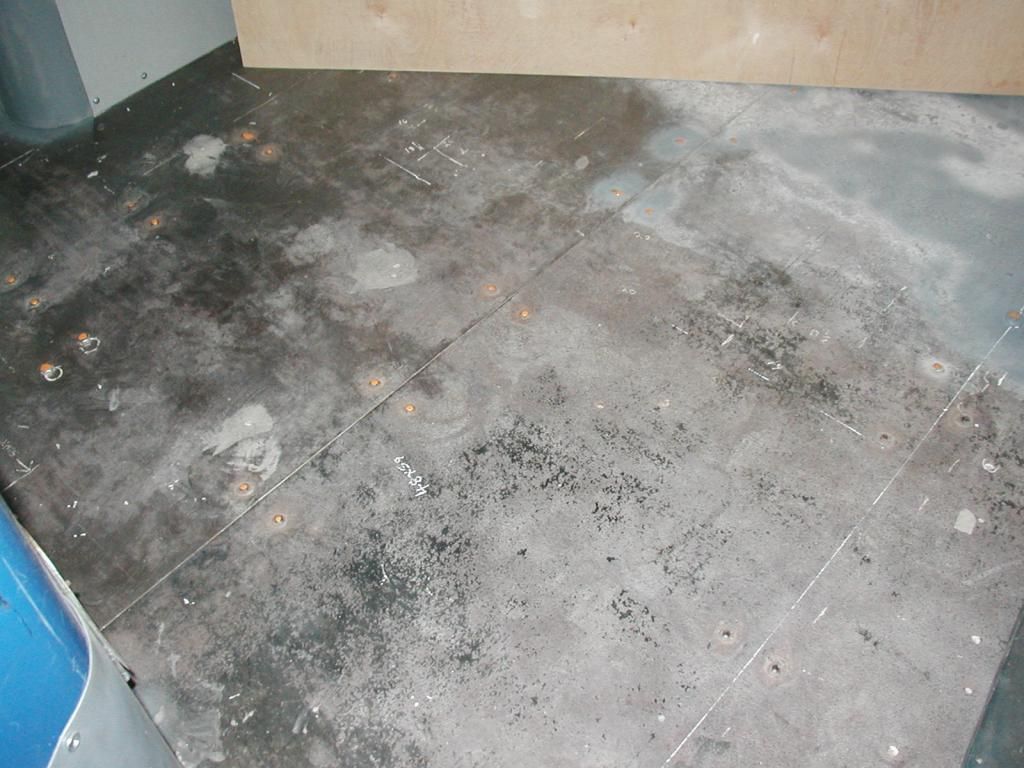
Magic marks.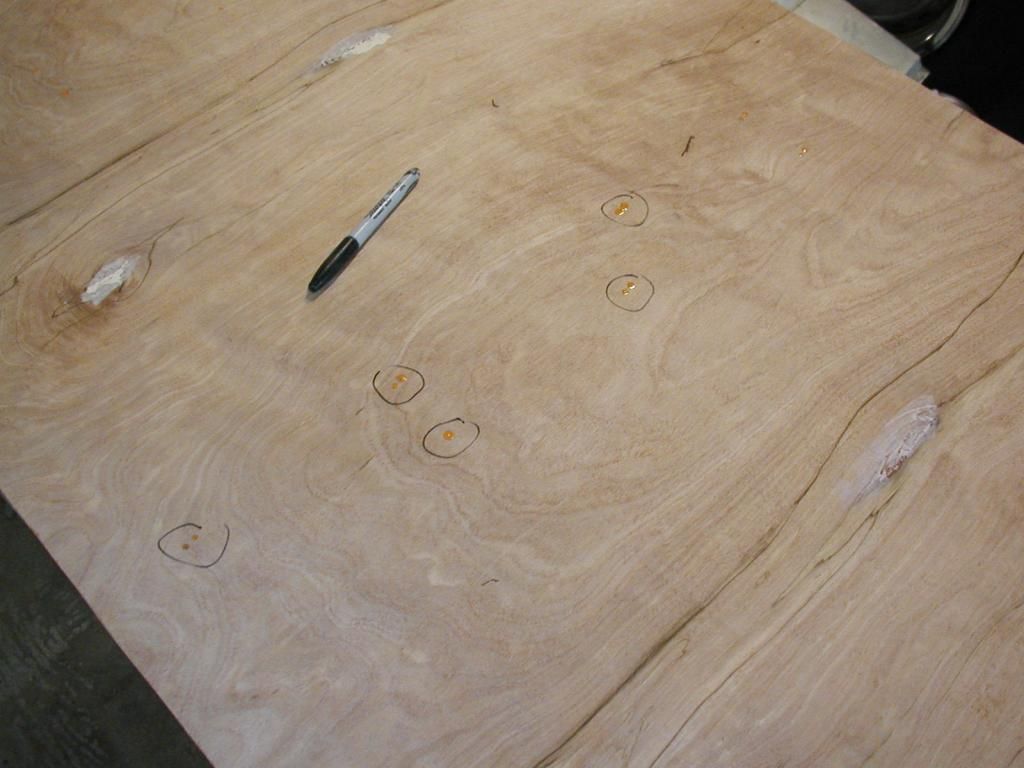
Relief holes drilled.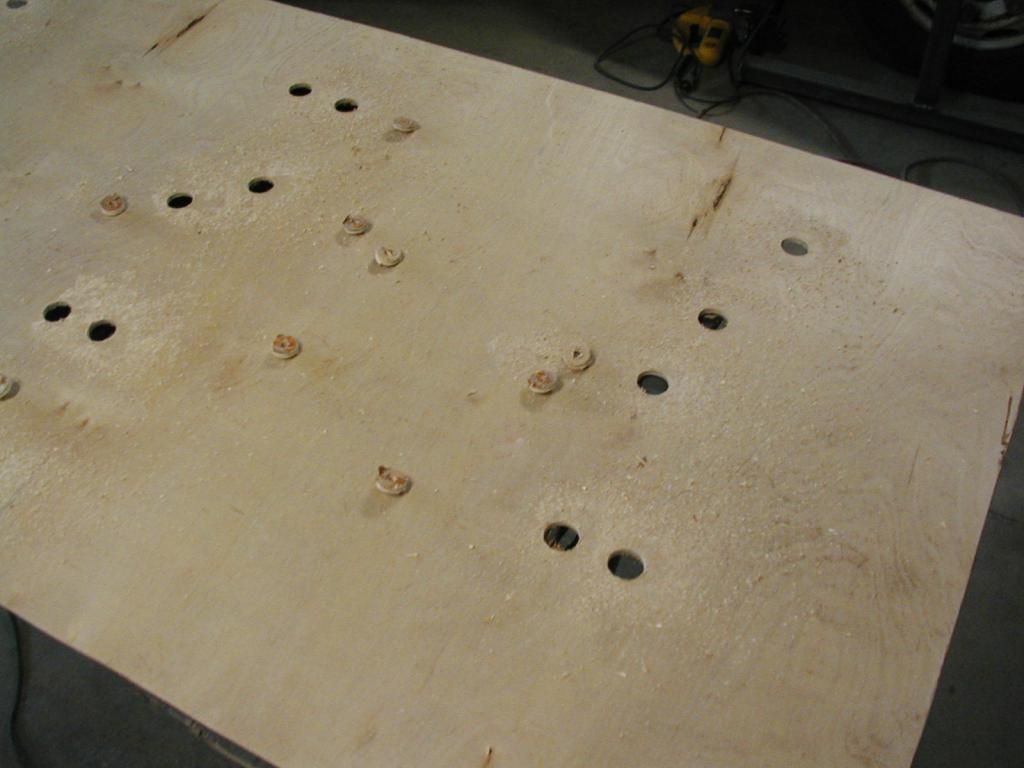
Paint on rivets.

Magic marks.

Relief holes drilled.

Who is online
Users browsing this forum: No registered users and 65 guests