somewhereinUSA build

Discussions about all things to do with buses, trucks, and the homes made within them.

Moderator: TMAX

User avatar
somewhereinusa
Posts: 323
Joined: Sat Feb 12, 2011 2:44 pm
Location: Andrews, Indiana
Contact:

Entry steps

Post by somewhereinusa »

Got the entry steps finished today. All but the top riser, it will have to wait until the floor is done.

Image

I'm not sure I like the boards above the floor line, it's some leftover laminate flooring.
ol trunt
Posts: 551
Joined: Thu Jan 17, 2013 2:51 pm
Location: Southern California
Contact:

Re: Another newbe

Post by ol trunt »

Hey Dick. Very nice job. Along with your screen and door it makes a great first impression. Jack
User avatar
somewhereinusa
Posts: 323
Joined: Sat Feb 12, 2011 2:44 pm
Location: Andrews, Indiana
Contact:

Re: Another newbe

Post by somewhereinusa »

One of the prizes I found on our surplus excursion was a fantastic fan and motor with out the housing. Since I wanted to use the roof escape hatch it was just the thing.

Finished and mounted.

Image

Switch detail

Image

Fan and screen detail

Image

Fan open for access to open hatch.

Image

Dick
ol trunt
Posts: 551
Joined: Thu Jan 17, 2013 2:51 pm
Location: Southern California
Contact:

Re: Another newbe

Post by ol trunt »

Hey Dick, very nice. I especially like the ability to either exhaust or draw air in--gotta love those DC motors. In hot dry climes with the fan on exhaust and a mister on your fancy screen door you would have an instant swamp box A/C unit 8) 8) 8) 8) Jack
User avatar
somewhereinusa
Posts: 323
Joined: Sat Feb 12, 2011 2:44 pm
Location: Andrews, Indiana
Contact:

Re: Another newbe

Post by somewhereinusa »

Hey Jack, good idea about the mister, I hadn't thought of that. In my part of the country, though, they don't work. Already too much water in the air :(
User avatar
somewhereinusa
Posts: 323
Joined: Sat Feb 12, 2011 2:44 pm
Location: Andrews, Indiana
Contact:

Re: Another newbe

Post by somewhereinusa »

Yippeeee, :D :D :D :D Since it's now warm out I figured I had better look into getting the boiler problems solved. The water leak that I thought was going to be a major pain to fix turned out to be stupidity on my part. I forgot to crimp one of the PEX clamps. On my first tries to fire the boiler last winter I kept getting an overheat fault code. This is usually due to poor water circulation, I rigged up a switch to manually torn on the water pump and added a bleed valve. I had thought that my original design wouldn't need a bleed valve, but it did the trick. I had heard that some people had an objection to the noise. The unit I have has a high and low, depending on water temp. While on start up and high it is some what noisy outside. Inside, even without a wall between me and it, I can hardly hear it run. On the low setting, outside it's quieter than many LP RV waters, inside you can hardly hear it. My exhaust goes out the top so the noise is high. Even on high it's no problem carrying on a normal conversation right beside the exhaust. My system used two heat exchangers. one for domestic hot water and the other is to get/send warm water from the engine. My domestic water was warm after about 10 minutes. Now I can seriously start work on the plumbing for the radiant heat. :D
ol trunt
Posts: 551
Joined: Thu Jan 17, 2013 2:51 pm
Location: Southern California
Contact:

Re: Another newbe

Post by ol trunt »

Hey somewhere, I know what you mean about "stupidity" and water lines. Last January after a small earthquake here in Ca, I discovered that the trembler had caused a crack in the inlet water line on the hot water tank in my Granny flat--the place was FLOODED. I replaced the flex pipe (and the carpet) and felt pretty smug. Within a week a second quake broke a water pipe under the concrete floor of the kitchen in my 70ish yr old house. Oh well, whats ten grand. While I waited for the plumber to fit us into his schedule, my buddy Jeff sugested we could run PVC from the meter, across the garage floor and to the water heater for the GF as well as water to its bathroom--thereby eliminating the need to move to a hotel. 10 hrs and $18 later I had water etc. The problem arose because while I am a sort of go for it guy and cut and glue PVC as I work, Jeff insisted that we cut and fit the pipe and then go back and glue it. About 1000 hrs and long after Jeff had departed to his cozy abode, I decided to have a nice hot shower in the granny flat as my reward for a long day's work. Soap bubbles everywhere and then no water! I opened the shower stall to see what I could see and what I saw was water gushing out of a 3/4 inch pipe and playing on the bathroom ceiling like a crazy fire sprinkler! Seems we had stupidly neglected to glue the joint just before the shower door--my new carpet--where is the shut off--where is the shop vac--then finally where is the extension cord to plug in the shop vac (OSHA approved 12" cord on shop vac). All acomplished (with me naked as a J bird) as the water began to crest at the bathroom door--not a pretty site. Glad you found the missing crimp before there was any damage. Now quit reading this junk and get back to work! Jack
User avatar
somewhereinusa
Posts: 323
Joined: Sat Feb 12, 2011 2:44 pm
Location: Andrews, Indiana
Contact:

Re: Another newbe

Post by somewhereinusa »

Glad to know I'm not alone. :screwy:
Dusty
Posts: 356
Joined: Sat Jan 09, 2010 6:06 am
Location: New Zealand
Contact:

Re: Another newbe

Post by Dusty »

:D :D
58 Bedford House
User avatar
somewhereinusa
Posts: 323
Joined: Sat Feb 12, 2011 2:44 pm
Location: Andrews, Indiana
Contact:

Re: Another newbe

Post by somewhereinusa »

Woohoo, I have heat. I know it's the wrong time of year for that. :D I finally got the first loop plumbed, sending hot water through the original heater core plus an extra one I added specifically aimed at the drivers feet. The boiler I have is an Espar Hydronic 10. It has 2 stages, when the water temp get above a certain level it goes to idle until the temp drops below a preset level then the burner increases again. I haven't been able to find what the temps are, but the outlet of the boiler runs about 106 degrees F. Temp drop in the entire loop is about 4 degrees. Since it's 70 here today, I'm sure the temp drop will be greater when it's colder, and also when I get the other three loops installed. I had originally planned on four zones with the front heaters tied into the front room, each room controlled by a thermostat. I changed that so that the original heat loop is controlled manually with switches on the drover console. The front living and kitchen will be on the second loop. There is a forced air as well as in floor heat. The living room and kitchen will be on the same loop. The bathroom and bedroom will each be on their own separately controlled loop Next step is to get cabinet framing done so that I can finish the heating plumbing.
ol trunt
Posts: 551
Joined: Thu Jan 17, 2013 2:51 pm
Location: Southern California
Contact:

Re: Another newbe

Post by ol trunt »

Hey Somewhere, 8) . Is the forced air in the kitchen and living area part of the same system--how does it work? Jack
User avatar
somewhereinusa
Posts: 323
Joined: Sat Feb 12, 2011 2:44 pm
Location: Andrews, Indiana
Contact:

Re: Another newbe

Post by somewhereinusa »

Hay Jack,
Forced air was probably a bad choice of words.
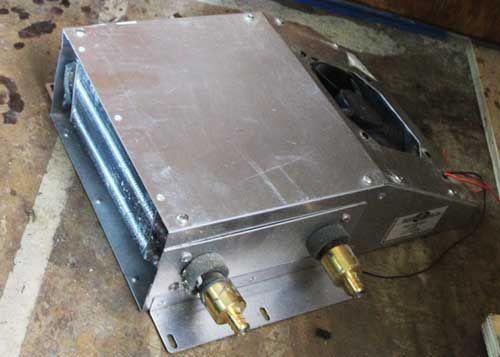
I have one of these for each of the rooms, plumbed in parallel with the the tubing under the floor for each unit. Each one has a sensor to turn on the fan when the water warms up, not sure if I'll use it or a switch or both. I was going to use heater cores and build a box with a fan, but I got such a good deal on these I couldn't turn it down. I got 5 of these and one that is bigger with two fans for something like $65.

Image

This is the foot heater (lived here all my life, I HATE cold feet)

Image

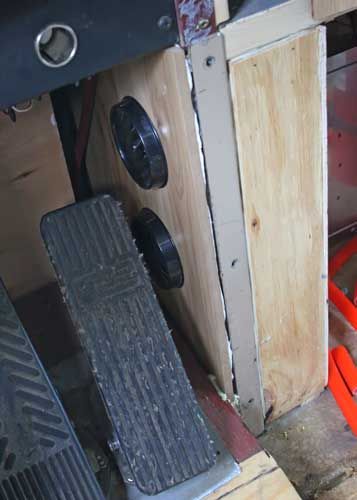
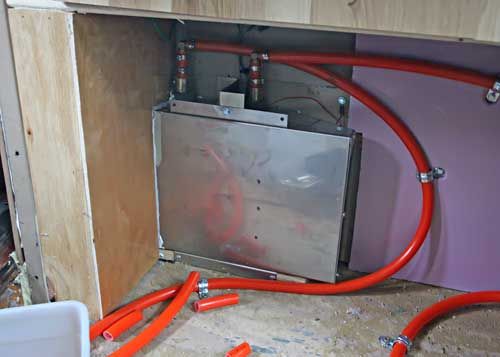
This is the back side of the foot heater.

Image

I keep reading about how noisy and stinky these things are. I can hardly tell it's running inside the bus, and I don't even have the wall in yet. When it's on low it makes less noise than an RV furnace.
On start up there is a few wisps of whitish smoke. It does make some noise when running on high, but I've heard high dollar RV's water heaters much noisier. Pretty much all of the noise is out the exhaust, and mine goes out the top, so it's 6 feet above your head.

Dick
ol trunt
Posts: 551
Joined: Thu Jan 17, 2013 2:51 pm
Location: Southern California
Contact:

Re: Another newbe

Post by ol trunt »

Hey Dick, its sort of what I imagined--only better. You got a killer deal on the cores and fans. Your setup has given me food for thought as I don't as yet have the heater/defroster worked out for my bus. Jack
User avatar
somewhereinusa
Posts: 323
Joined: Sat Feb 12, 2011 2:44 pm
Location: Andrews, Indiana
Contact:

Re: Another newbe

Post by somewhereinusa »

Finally got the monitor stands built and the keyboard drawers done. I wanted a stand that was adjustable and also sturdy enough to not bounce. These are much more stable than any I had found, and much lexs expensive.

Image

Monitor mounted

Image

There will be two of these

Image

This wasn't the original plan. Everything was going to be on the desk. But, since it is mounted over the front wheel well, it would have been uncomfortable sitting at the computers for any length of time. I like this even better, plenty of leg room while working and the keyboard and mouse can stay here while traveling. That had been a problem in the past in the setup I had in the trailer. There will eventually be a door in front of the keyboard drawers that folds down, That is the kind of extras that will come in phase II. Mumsywumsy says we need a shower before she will go anywhere. :roll: Now, I guess I'll also have to get that second computer looked at, It died sometime at the last event. I haven't quite figured out a resting place for the monitor for computer three. Probably on wall above this one, I only have to see it once in a while, and then just to hit an enter key.
User avatar
somewhereinusa
Posts: 323
Joined: Sat Feb 12, 2011 2:44 pm
Location: Andrews, Indiana
Contact:

Re: Another newbe

Post by somewhereinusa »

I finished up the hitch today. I'll either have to move "stuff" or move the bus to try out hitching up the towd.

This is the bracing I put inside the bumper. Final version changed a little. I had to cut notches in the brace to clear air conditioning pulleys.

Image

It still gave a little, so I tied it into the lower engine mount. It doesn't give at all now.

Image

Here is view of everything installed.

Image

Putting the pin in is a little tricky, but can be done from above or below. Not with the engine running though. :lol:

I couldn't get any usable pictures that showed the inside when mounted.

Dick
Post Reply

Who is online

Users browsing this forum: No registered users and 154 guests