Page 11 of 15
Re: somewhereinUSA build
Posted: Tue Aug 12, 2014 2:29 am
by somewhereinusa
Took a short trip with the "new" towed. Can't even tell it's back there unless you look in the rear camera or look in the mirrors while turning. Plans are for the truck to be painted the same blue as the bus with the topper done in some left over buscoat. That should keep the girls cool enough.

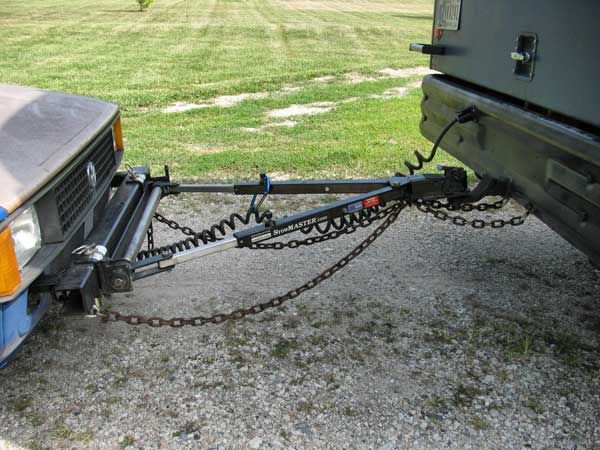
Hitch detail. I can remove the hitch by pulling two pins and put the bumper back on with two smaller pins. Is this too much of an angle, or do I need to use a dropped hitch?
Re: somewhereinUSA build
Posted: Tue Aug 12, 2014 3:25 am
by Lostranger
I am impressed. Thanks for sharing.
Does the invite still hold? I hope to be in Elkhart a week from tomorrow. Still planning to swing by Evansville on return trip. I'd love to stop and say hello. Would have an hour or two to visit.
Jim
Re: somewhereinUSA build
Posted: Tue Aug 12, 2014 4:09 am
by stuartcnz
Tow set up looks good. The photo doesn't indicate any angle issues, as is.
Do you put a bungee chord on the steering wheel of the towed, to dampen the steering?
Re: somewhereinUSA build
Posted: Tue Aug 12, 2014 5:52 am
by somewhereinusa
Jim, I'll be here sent you a PM, if you're bringing the bus, plenty of room and a turn around.
Stuart
I didn't , and I didn't when towing the jeep. Really hadn't heard of it. I googled it and got a few hits. How would I know if I might need to? Unless things got really bad, I doubt that I would feel it. Both vehicles tracked well whenever I looked at the camera. Some of the steering bungee I saw pictures of looked like they were really tied down so much as to limit steering wheel travel which would, I think scrub the tires.
Dick
Re: somewhereinUSA build
Posted: Tue Aug 12, 2014 6:06 am
by stuartcnz
You probably don't need to. I was only aware of using a bungee, from an old grader operator I used to work with. He used to tow a ute out to his work areas, behind the grader, to travel back in at the end of the day. He left the grader out at the area he was working. I suspect that because he was towing down gravel roads, it may have been more of an issue, especially with potholes.
Re: somewhereinUSA build
Posted: Mon Aug 18, 2014 3:56 am
by Jerry Campbell
Looking good!
I had trouble with my little VW pickup jumping back and forth, the steering wheel banging back and forth, if I turned too sharp or driving over a ledge. I replaced the front struts and the problem stopped.
I like the idea of a bungi cord. I think I'll do that this year.
Thanks for the idea.
Jerry
Re: somewhereinUSA build
Posted: Tue Aug 19, 2014 5:52 am
by Lostranger
Hey Dick. Got your message. Thanks for the contact. Leaving tonight for Elkhart. Hope to see you for a bit on Tuesday afternoon or Wednesday morning. I'll call when I know more.
Jim
Re: somewhereinUSA build
Posted: Wed Aug 20, 2014 10:58 am
by Lostranger
Dick, any suggestions for window sources in Elkhart. Going back to RV Parts Nation first thing Wednesday. Their window selection is weak. Factory RV Surplus was closed when I hit town. Will go back tomorrow. Could not find RV Surplus Inc. Listed as 1400 W Bristol, but I did not see it.
That's all of which I am aware.
Re: somewhereinUSA build
Posted: Thu Aug 21, 2014 12:20 am
by somewhereinusa
Jim
Best (most) windows are in White Pigeon, MI.
Bontragers, 18719 US 12, a couple of miles east of town.
Johnsons, 12195 US 12 a few miles west of town.
White Pigeon is only 24 miles from Elkhart. Those two have a large window selection and prices are better than the Elkhart places.
Call me.
Dick
Re: somewhereinUSA build
Posted: Sun Sep 14, 2014 9:18 am
by somewhereinusa
I've been trying to figure out how to wire my light switches. The shower was a particular problem since the walls aren't hollow so there was no place to hide the wires or mount the switch. I had an old 4 channel remote that was a take off, and it works perfectly. I can mount the remote anywhere and it controls
1 the room
2 the vanity area
3 inside the shower
4 mood lighting so you don't stumble around in the dark at night.
The unit is a bit annoying since it has an on button and an off button. The newer units you just push the button again to turn it off. The old unit is only 5A per circuit,but all of my lights are led, the whole room doesn't draw 5A. Most of the new units are 10A per channel.
If I recall the unit I used was expensive, but new units are available for about $20 for four channel and two remotes. I can mount one in each room and just tap into the power cable that runs the length of the bus. I had put a tap in each room on that cable. This allows for more control of the lights and less wire runs. I can simply run a wire to each light from the receiver and don't have to run a wire for individual switches. I don't think the cost will be much different than individual switches, maybe even less.
Pictures of the new PERMANENT shower walls and shower pan soon.
Re: somewhereinUSA build
Posted: Mon Sep 15, 2014 9:47 am
by somewhereinusa
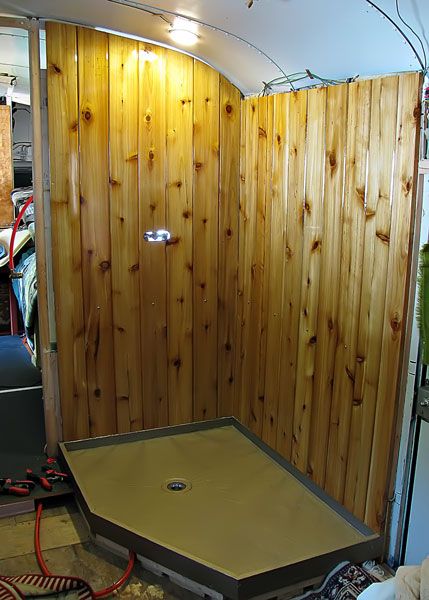
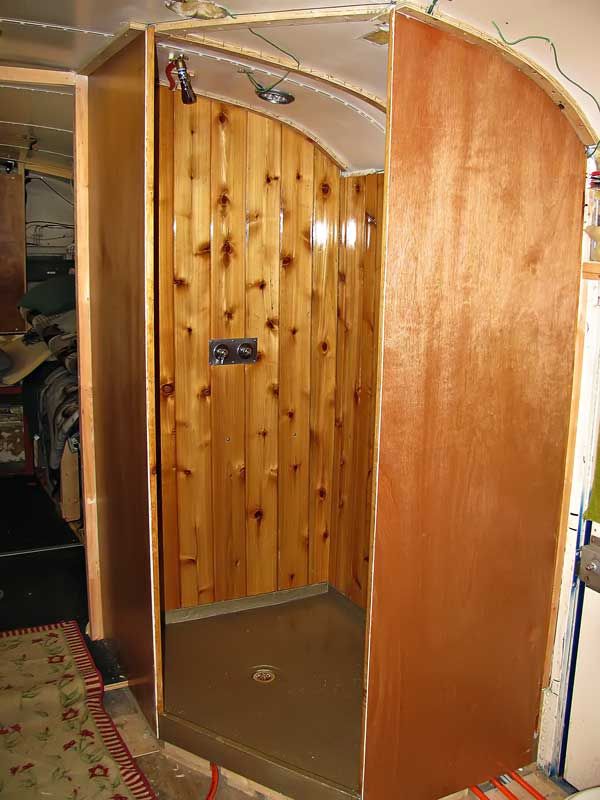
Here's a view of the shower pan and first two walls up.
Walls are redwood tongue and groove that I glued together then four coats of clear poly.
Jack,
Thanks for the suggestion on the shower pan, it now has 3/4" slope from edge to drain, did a rough test and water heads down the drain. Should be
easier to get water out when bus isn't level.
Don't know if I did it right, cut strips of wood with the slope I wanted and glued them to the base.
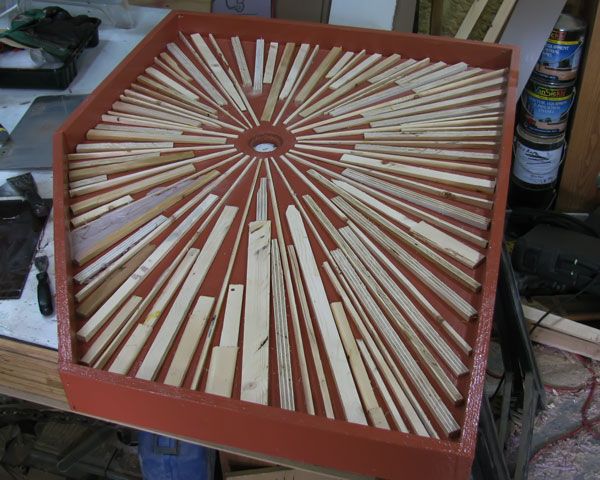
Then filled the gaps with body filler.
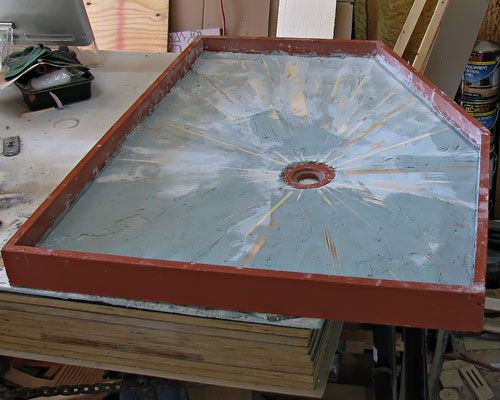
Then I recoated everything with the shower waterproofing stuff, then painted.
Re: somewhereinUSA build
Posted: Mon Sep 15, 2014 10:21 am
by Dennis The Bus Dweller
Hmm, cool

Re: somewhereinUSA build
Posted: Thu Sep 25, 2014 1:16 am
by somewhereinusa
Shower has 4 walls and is usable again. I am now on the second shower head that I don't like. The ceiling is slats and is being glued up so, it's going a bit slow, have to wait for one to set before gluing the next one. Light fixture will be replaced by one I'll build when It's too cold out to do things outdoors.For now I'll use a shower curtain, door can also wait until bad weather. I also have to find the hinge I bought last winter. I put in that "place" for save keeping. Boy, I wish I could find that place, it must have all kinds of neat goodies that I've bought in 65 years.

I'm really liking the remote controls for lighting I started using. All of the wiring can be hidden, I have four separate circuits for each room and I dont' have to cut holes for switches. Plans are to just build some sort of mounting bracket for the transmitter.
Re: somewhereinUSA build
Posted: Thu Sep 25, 2014 7:55 am
by Dusty
Very nice wood

Re: somewhereinUSA build
Posted: Thu Sep 25, 2014 10:24 pm
by Lostranger
Looks great as usual, Dick. Keep up the good work. I see hydronic floor coils still showing. What are you going to use for finish floor?
Jim


