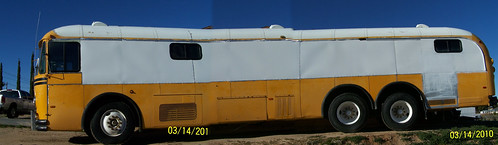
I took my last route off and asked my dad to come down from Laughlin, NV to help hang the three remaining sheets of aluminum. The result looks pretty good. I had previously welded in some 110 feet of 1.25" square tube for window frames and other sidewall reinforcment. The panels are riveted on 3" centers around the perimeter with Sikaflex 252 adhesive bonding the interior of the panels to the new and existing framing.
Photos to follow.
http://farm4.static.flickr.com/3139/297 ... 205662.jpg
http://farm4.static.flickr.com/3137/297 ... ddaa84.jpg
http://farm4.static.flickr.com/3174/297 ... 61d9b7.jpg
http://farm4.static.flickr.com/3160/297 ... 19e783.jpg
http://farm4.static.flickr.com/3221/297 ... 3e9203.jpg
Elden in Hesperia
Elden's Bus Right Side Complete
Moderator: TMAX
-
etinhidesert
- Posts: 28
- Joined: Sat Dec 23, 2006 7:28 am
- Location: Flagstaff, AZ
- Contact:
Elden's Bus Right Side Complete
Last edited by etinhidesert on Sat Nov 01, 2008 5:23 pm, edited 12 times in total.

Let's check 'em out large-size:


You must have had hours of grinder fun Elden, getting the belting steel off and removing all of the metal at the bottom of the window wells. I decided to just leave all that steel in place, rather than try and remove it. I cut the hat channel just above the diagonal strip that served to dump water running down the windows on the outside of the lower skin. The 1/2" gap that the water was intended to exit from is filled now. Until I had removed the windows and the interior sheet metal, the wasps and yellowjackets were using my bus as a mothership, the gap betwwen the lower skin and the belting made a perfect beehive entrancve for them!
You must have had hours of grinder fun Elden, getting the belting steel off and removing all of the metal at the bottom of the window wells. I decided to just leave all that steel in place, rather than try and remove it. I cut the hat channel just above the diagonal strip that served to dump water running down the windows on the outside of the lower skin. The 1/2" gap that the water was intended to exit from is filled now. Until I had removed the windows and the interior sheet metal, the wasps and yellowjackets were using my bus as a mothership, the gap betwwen the lower skin and the belting made a perfect beehive entrancve for them!
-
etinhidesert
- Posts: 28
- Joined: Sat Dec 23, 2006 7:28 am
- Location: Flagstaff, AZ
- Contact:
Thanks for "Bumping" up the images. I still can't figure out how to post the pictures with in the forum.
My pneumatic chisel took care of most of the rivet busting and spot weld breaking. Where I slipped and cut more than I wanted the wire feed welder made quick work of the repair. The cutting and fitting of the new framework only took two days, after many miles of thought (I do a lot of my planning while driving almost 2000 miles a week). I was able to find 20 tubes on E-Bay of the Sikaflex 252 for $20.00 plus $5.00 for shipping. Normally about $20.00 per tube. I still have 17 tubes left. Should have plenty for the rest of the project.
Elden in Hesperia
Elden, it's pretty easy to post photos in the text. Look at the row of buttons along the top of the "Posting a Reply" page. There is one labeled "IMG". You click that once, type (or copy-paste) in the address of the photo, then click the button again (once).
Hit the return key afterwards to put a break between photos or you photo and text, and continue with additional phtotos, or type more.
It's also possible to simply type in the BBcode that indicates images:
Will display this image:

(Note that I placed the example of the BBcode in a "code" box so it would display as text instead of as an image)
There's more than you wanted to know about BBcode in the Userguide, specifically the BBcode section
To enlarge your images, I simply dropped the "_s" and "_m" from the end of the image address (before the ".jpg").
Hit the return key afterwards to put a break between photos or you photo and text, and continue with additional phtotos, or type more.
It's also possible to simply type in the BBcode that indicates images:
Code: Select all
[img]http://www.mrsharkey.com/d2gfx2/solwest04.jpg[/img](Note that I placed the example of the BBcode in a "code" box so it would display as text instead of as an image)
There's more than you wanted to know about BBcode in the Userguide, specifically the BBcode section
To enlarge your images, I simply dropped the "_s" and "_m" from the end of the image address (before the ".jpg").
-
etinhidesert
- Posts: 28
- Joined: Sat Dec 23, 2006 7:28 am
- Location: Flagstaff, AZ
- Contact:

-
Jones'n4chrome
- Posts: 778
- Joined: Mon Dec 31, 2007 3:10 pm
-
etinhidesert
- Posts: 28
- Joined: Sat Dec 23, 2006 7:28 am
- Location: Flagstaff, AZ
- Contact:
-
Jones'n4chrome
- Posts: 778
- Joined: Mon Dec 31, 2007 3:10 pm
-
etinhidesert
- Posts: 28
- Joined: Sat Dec 23, 2006 7:28 am
- Location: Flagstaff, AZ
- Contact:
-
Jones'n4chrome
- Posts: 778
- Joined: Mon Dec 31, 2007 3:10 pm
-
etinhidesert
- Posts: 28
- Joined: Sat Dec 23, 2006 7:28 am
- Location: Flagstaff, AZ
- Contact:
-
etinhidesert
- Posts: 28
- Joined: Sat Dec 23, 2006 7:28 am
- Location: Flagstaff, AZ
- Contact:
-
Jones'n4chrome
- Posts: 778
- Joined: Mon Dec 31, 2007 3:10 pm
Who is online
Users browsing this forum: No registered users and 6 guests