DIY Skylight Advice!

Discussions about all things to do with buses, trucks, and the homes made within them.

Moderator: TMAX

Post Reply
HoFFdOg
Posts: 17
Joined: Tue Sep 25, 2007 6:39 am
Location: Great Britain
Contact:

DIY Skylight Advice!

Post by HoFFdOg »

Merry Christmas & seasons greetings all.

I felt i needed to consult others before attempting one of the bigger jobs i have to do on my truck and one which is preventing me from insulating and cladding the roof & generally slowing the project down. That is, how to go about constructing skylights.

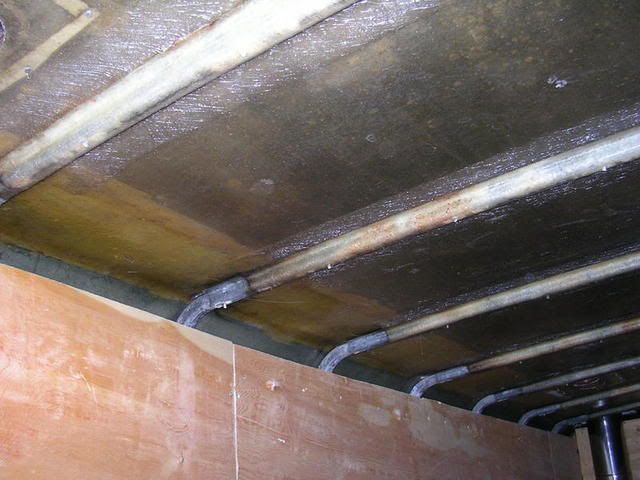
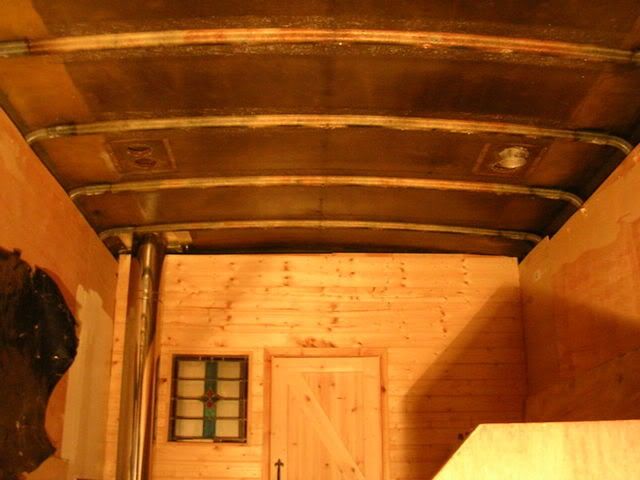
I have a fibreglass roof supported by steel & aluminium supports that are glassed in with the rest of the roof. These supports are spaced about 2ft apart. My initial plan was to have two large skylights (one above lounge & kitchen area) by cutting through one support per a skylight & bracing to the other supports with steel strips and roofing bolts (as no welding experience as of yet)! However i have been warned away from doing this by a few individuals who say this will drastically affect the strength of the roof, and as im a total newbie to messing around with things of this nature to just stick with putting in skylights between the steel supports.

Ive had lots of head scratching about how to construct & fix the skylights securely (i hadnt so much as picked up drill before this project but have now learnt to build doors, worktops, a table and cabinets etc). Im really stubborn about not settling for horrible caravan/motorhome windows but not sure how i can achieve a weatherproof solid opening skylight. From studying other skylights it seems i need to build a kerb/frame that is fixed to the roof permanently and an opposing frame glazed with polycarbonate sheet that is fixed and sits on top.

- Sould i construct the frames from wood or from aluminium 'L' section (bareing in mind i 'currently' have no welding or metal work experince). I was told by one individual if i use wood for the frames, its gonna leak!!! Is this true? I feel more comfortable working with this material. Would a kerb frame from 'L' section with an opposing wood glazed frame be the way to go?

- How should i secure the kerb frame to the roof (Adhesive/screwed from underneath etc). As regards the two frames, do i just build two rectangle/square frames with the glazed frame slightly bigger so it slots right over the kerb or maybe router a rebate so the frames sandwich together?

- I have a gut feeling these skylights can not just sit on fibre glass and will have to supported (or maybe im wrong?), how can i do this?

I guess what im really after is a detailed walk through guide on building and fitting DIY skylights that look the job and dont leak from anyone who's pulled it off before. :lol:

I am particularly interested in how you Sharkey did the skylights in your Chevrolet C-40 as from the photos the two big skylights you have is exactly what im after. Did you construct and fit these yourself or buy and fit commercially made rooflights??

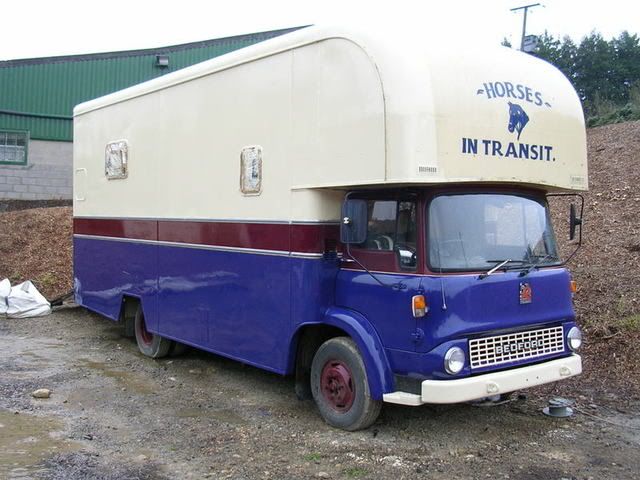
There are some pics of the roof of the truck to get an idea of what im trying to do. Plus just one of the truck so you guys can see the ol' girl! :wink:

Any help and advice is moochus appreciated

Thanks. Dan

Image

Image

Image[/img]
Sharkey
Original Founder
Posts: 1364
Joined: Sat Oct 09, 2004 4:00 am
Contact:

Post by Sharkey »

Dan, I built the two skylights in my Housetruck's living area from wood, and once I figured out how to properly flash them to the steel roof, I've had no leaks. The light over my wood stove has an operating glazing, meaning that it's a hatch and can be opened for ventilation. Both of these lights are made of mahogany, with lexan glazing. No particularly high tech materials or methods were used to construct them or mount them to the truck.

The skylight over my bed is a custom-made, double-grazed commercial aluminum framed unit that has leaked since the day I put it in. I currently have it covered by sheet plastic to stop the drips on my bed.

Wood is a fine material for construction, but you need to be very careful about sealing it from the elements. Look at any fine yacht, the skylights will be made of wood. On a marine vessel, exposure not only to precipitation, but being swamped by waves is possible, and many ingenious designs exist to prevent intrusion by water and to drain comings and vents of standing water to prevent rot.

I would agree that you should not cut the steel framing in your roof to put in a skylight. A 2x3 or 2x4 foot skylight placed between the rafters is going to flood the interior with light. Putting in two or more such lights spaced apart by 2 feet is going to really illuminate the inside of your truck. I didn't cut any of my framing, and I'm very glad I didn't.

You have a distinct advantage in that you have a fiberglass roof. I'd recommend wooden frames, screwed from below through the framing (if possible), and then before putting on the glazing, apply fiberglass resin and cloth to make the curb an integral part of the roof. No leaks this way! I had to seal to a galvanised steel roof and it took a while to find the right combination of materials to do the job properly.

My skylights protrude about 1" above the roof of the truck, but I have not found this to be a problem with branches, wires, etc. The opening light is actually taller, probably 2-1/2". I've always had more problems tearing up my chimney cap on trees when moving.

Nice stealth installation. No one would pay any attention to a horse transport truck parked up, even if it was rocking around violently!

Let me see if I can work up a diagram of my lights to help you design something that will work on your truck. Mine have been very useful and integrated into the ceiling well. I also have insulating covers to help keep the interior heat from escaping.
User avatar
Dennis The Bus Dweller
Seasoned Nomadicista
Posts: 1875
Joined: Mon Nov 15, 2004 9:33 am
Location: Southold N.Y.
Contact:

Nice rig Dan

Post by Dennis The Bus Dweller »

Hi Dan

I make custom doors and windows all the time and it's really not to big a deal. But I guess it's because I've done it for years now. Now is a good time to plug Rogers book. It may be the best house truck / house bus picture book out there. I don't have mine with me but I think there are some pretty good pics of how Roger and I think some others built theirs. They did it the most basic way and im betting they worked pretty good for a long time' If you don't have a copy of "Some turtles have nice shells" by Roger Beck you should get your self a copy. It's great stuff. You may find a couple of pics on his site at www.housetrucks.com im not sure.
Peace along the way
Dennis the bus dweller N.Y.
HoFFdOg
Posts: 17
Joined: Tue Sep 25, 2007 6:39 am
Location: Great Britain
Contact:

Post by HoFFdOg »

Sharkey wrote:Dan, I built the two skylights in my Housetruck's living area from wood, and once I figured out how to properly flash them to the steel roof, I've had no leaks. The light over my wood stove has an operating glazing, meaning that it's a hatch and can be opened for ventilation. Both of these lights are made of mahogany, with lexan glazing. No particularly high tech materials or methods were used to construct them or mount them to the truck.

The skylight over my bed is a custom-made, double-grazed commercial aluminum framed unit that has leaked since the day I put it in. I currently have it covered by sheet plastic to stop the drips on my bed.

Wood is a fine material for construction, but you need to be very careful about sealing it from the elements. Look at any fine yacht, the skylights will be made of wood. On a marine vessel, exposure not only to precipitation, but being swamped by waves is possible, and many ingenious designs exist to prevent intrusion by water and to drain comings and vents of standing water to prevent rot.

I would agree that you should not cut the steel framing in your roof to put in a skylight. A 2x3 or 2x4 foot skylight placed between the rafters is going to flood the interior with light. Putting in two or more such lights spaced apart by 2 feet is going to really illuminate the inside of your truck. I didn't cut any of my framing, and I'm very glad I didn't.

You have a distinct advantage in that you have a fiberglass roof. I'd recommend wooden frames, screwed from below through the framing (if possible), and then before putting on the glazing, apply fiberglass resin and cloth to make the curb an integral part of the roof. No leaks this way! I had to seal to a galvanised steel roof and it took a while to find the right combination of materials to do the job properly.

My skylights protrude about 1" above the roof of the truck, but I have not found this to be a problem with branches, wires, etc. The opening light is actually taller, probably 2-1/2". I've always had more problems tearing up my chimney cap on trees when moving.

Nice stealth installation. No one would pay any attention to a horse transport truck parked up, even if it was rocking around violently!

Let me see if I can work up a diagram of my lights to help you design something that will work on your truck. Mine have been very useful and integrated into the ceiling well. I also have insulating covers to help keep the interior heat from escaping.
Hey Sharkey, thanks for your reply and advice. Your kind offer of working up a diagram of your skylights would help me out enormously, i would really appreciate that if it was no hassle for you. 8)

Did you have to double glaze with polycarbonate to reduce problems with condensation or would that not be an issue with this material??

Your idea of flashing the kerb frame to the roof with fibre-glass is great, yet so obvious i cant believe i didnt think of doing it especially as i have a big roll of cloth and loads of resin knocking around.

Im still unsure of how to construct a design for the opening glazed hatch as well as integrating the frames into the ceiling like you mentioned!? Would the solution be to build a second internal frame underneath the external kerb, so the two essentially 'sandwich' the fibreglass roof. Then fixing with adhesive and screwing up through both frames and the fibreglass??

Also, i think there could be problems screwing the frame up through the supports! Would there be enough strength in the fibre glass alone to hold the frame (an inch or so inside the steel supports) or would i need to strengthen the fixing area between frame and fibreglass by sandwiching the two over aluminium strips riveted over the steel roof supports??

I really am just guessing solutions here, so please forgive my rambling posts, i just want to be sure exactly what to do before i cut big whacking holes in the roof of my beloved home!

Thanks. Dan
Sharkey
Original Founder
Posts: 1364
Joined: Sat Oct 09, 2004 4:00 am
Contact:

Post by Sharkey »

No problem, I already worked up a diagram of the fixed skylight. The operating one will have to wait a bit, as we are currently having a big wind storm, which usually causes the mains to fail, and I don't want to lose work when/if that happens, but I'll get something up soon.

My skylights are created with two frames laminated together. The outer frame is 1x1 mahogany, and the inner frame is 1x6. Basically, the curb and inner trim are integral. This means that the whole assembly is one unit, and is bonded for strength and water proofing. In order to use this method, you'll need to know how thick your finished ceiling will be. This wasn't a problem for me, as I had part of the ceiling finished before I built the first skylight, so I just measured the finished part of the ceiling.

I used some scrap acrylic sheet that I picked up at the second hand lumber yard, and built the frame to fit. If you are purchasing your materials new, you can design around your rafters instead of your materials. Here's the diagram:

Image

I used double-sticky weather stripping to bond the acrylic and frame, then drilled and set brass wood screws in from the top. Looking back, I think I might have only used the double sticky tape, as the screws need caulking every few years. If you found some properly sized tempered glass, this would be even better. The acrylic eventually gets scratched from cleaning, branches, dirt, etc, and looks cloudy.

I left a gap at the edge of the weather stripping to allow me to squeeze a bead of silicone into the gap to seal against moisture. These days, I might pick urethane caulking, I've had very good luck with it.

The 1x6 material extending into the living space is finished with marine grade varnish, and made a handy fastening for the ceiling trim.

I would recommend against trying to make double glazed skylights unless you have a means of hermetically sealing between the panes. Moisture will get in and cloud the inside of the panes, and you will have no way to clean it out. I made removable wooden frames with plastic glazing that are held on with a few screws. A couple of times each winter, I pull them off and clean between the panes. It's also nice to completely remove them in the summer. My operable light has interchangeable double pane and screen frames, mounted by hinges to allow access.

You could try the sandwich method, although if you glass the frame in place, that is going to make it pretty rigid without any fasteners. I had a terrible time trying to seal my first attempts using screws up from the bottom and non-hardening putty between the frame and the roof steel. It was awful until I flashed the whole mess with galvanised angle and added loads of caulking. Using resin to make the curb a part of the roof will eliminate a lot of problems for you.

Oh great, now we're having a thunderstorm, I'm going to bail out and shut down the computer. More after the weather decides to play nice...
HoFFdOg
Posts: 17
Joined: Tue Sep 25, 2007 6:39 am
Location: Great Britain
Contact:

Post by HoFFdOg »

Wow, great diagram! I wasnt expecting something as professional looking as that! 8) Thanks so much for going to the trouble. Apologies for my long delays in responding to you on this post but i dont have internet on the land i currently reside!

I have just a few questions as regards this light. One concern i have is in securing the flat frame to my 'slightly' curved roof!! Obviously there will be a slight gap, between the frame and roof. Filling this gap seems a much easier solution than fannying about with cutting the wood frame to the roof profile, even tho it doesnt have to be perfect as i will be glassing the thing to the roof.
You mentioned about a 'hardening putty' that you used when fitting your lights. Im assuming this putty is the 'key' to securing my flat frame to the curved roof!?? What sort of putty is this? I know of a putty called 'Milliput' which sounds like it would be suitible. In terms of applying this putty would i slap it on the underside of the frame and just push it down before screwing the frame in or apply as a filler afterwards!?

As regards the frame itself, is there a preference between using softwood or hardwood (in terms of weathering and durability), as i was just going to use standard planed softwood from my local DIY store. Also you mentioned the curb & inner trim were "laminated" together?!? Im assuming you simply mean 'glued' together as im not familiar with the term/procedure of 'laminating' wood!?

Many thanks. Dan
Sharkey
Original Founder
Posts: 1364
Joined: Sat Oct 09, 2004 4:00 am
Contact:

Post by Sharkey »

Dan, no problems on the quality of the drawing. Last winter I taught myself to use MS Publisher, which makes drawing basic shapes quite simple and allows modifying drawings very easy, as it's all done with vectors, meaning that all elements are movable, scalable, and can be altered in whatever way necessary.

My recommendation would be to use hardwood for your frame, but it's not absolutely necessary. I wanted a waterproof wood that would take fasteners well and add to the more exotic finishes inside the truck. Mahogany is fairly easy to work, has tight grain that takes screws well, and it varnishes up to a high gloss.

Perhaps I was a bit liberal using the term "laminated", but yes, it basically means glued, using urea-formaldehyde marine glue. I used hardwood dowels as fasteners, but then I was very into not using nails when these were constructed. There's probably not even a pound of nails in my whole truck, and most of them are in the floor. Even my kitchen cabinets are glued and pegged together with no metal fasteners.

I think it would be worth the extra time required to make your skylight frames fit the contour of your roof. Since the frame is made in pieces, arching the part where the external frame wood fits to the roof wouldn't be at all difficult if it was done before gluing. The better the fit, the less likelihood of problems in the future. Cutting the 1x1 pieces in an arch could be done with a bandsaw, coping saw, drawknife, or even just sanded to fit with a belt sander. The main frame of 1x6 needs no modification, make the 1x1 do all the work meeting the roof shape.

I used "non-hardening" putty, which was a problem, it was so squishy that it wouldn't allow the screws to ever tighten all the way up, and the result was leaks. I'd think if you are going to resin your lights into the roof, I'd bed them in resin. Another reason to make the frame fit tight against the roof.

Here's another knock-up drawing of the operable light, showing the top hatch frame and hinge. I've also thrown in a "energy panel" on the interior to give you that double glazed effect"

Image

That sould keep you out of trouble for a little while... :)
HoFFdOg
Posts: 17
Joined: Tue Sep 25, 2007 6:39 am
Location: Great Britain
Contact:

Post by HoFFdOg »

Great stuff! Thanks a million for your advice and diagrams. I feel much more confident about tackling and pulling off the job now. We're having alot of rain and wind at the mo in my part of the UK so when the sunshine arrives i'll be cracking on. Thanks again. Dan 8)
Post Reply

Who is online

Users browsing this forum: No registered users and 42 guests