Yes, it's true the diesel in the Crown tank is eleven years old, but appears to be in good shape. I filled the tank when I parked it to eliminate air and the subsequent condensation problems. I also treated the fuel with biocide to prevent the formation of organic sludge. I start the bus frequently (at least a couple of times a year), and have been using the fuel in the bus as an emergency fuel source for my various VW Rabbit diesel vehicles, and have experienced no problems. Of course, the cetane rating of the fuel is probably degraded, and I'll add cetane booster to make up for that, but as far as I can tell, there are no catastrophic fuel failures waiting.
Some years back, I was given a 1981 VW Rabbit diesel that had been parked for nine years. I put a fresh battery in it, let the glow plugs heat up well and it started like it had been sitting only nine hours. It had a half tank of fuel that had no special treatment when it was parked, and I ran that fuel with no issues.
Yet another reason to love diesels and avoid evil gasoline!
POTD 2006 (Progress on the Crown)
Moderator: TMAX

I think it should be fine. I think you should record your mpg, and the way it feels,etc.. with the first tank, then do the same for your 2nd tank, that being new fuel. compair the two. See what you think.
Ive always heard that diesel and other heavier fuels are quite stable, not really volitile.
Yours might be the true test to settle it once and for all!
-Dadeo
Ive always heard that diesel and other heavier fuels are quite stable, not really volitile.
Yours might be the true test to settle it once and for all!
-Dadeo
-
Guest
It is, and since I want to preserve the many hours of painstaking work I put into applying four coats of marine varnish on the back door and windows, I keep them covered up to limit exposure to rain and sun. Once I actually move into the bus, the tarp will be reserved for weather extremes such as heavy blowing rain. I just don't see a reason to "start the clock" on the varnish's life expectancy any sooner than necessary.
<table border="0" width="100%" bgcolor="#FFFFC0"><tr><td>Updates! Ja, mon, I be jammin'!!!
Last Thursday, I stopped by the industrial hose and connector supply store and purchased a few feet of rubber sheeting. Although it took a few hours to lay it all out and cut the required shapes, I now have new flooring in the driver's compartment of the bus:
<center> </center>
Of course, none of the areas were parallel or perpendicular to each other, so I had to make each cut purposefully to avoid stupid mistakes and ugly gaps. For now, the flooring is simply laying in place, but with a few more hours of applying filler and sanding, I should be ready to use some adhesive and plaster it to the floor permanently. Then, conduits, then the drivers seat, then supply wiring..... etc.
</td></tr></table>
Last Thursday, I stopped by the industrial hose and connector supply store and purchased a few feet of rubber sheeting. Although it took a few hours to lay it all out and cut the required shapes, I now have new flooring in the driver's compartment of the bus:
<center>
</center>Of course, none of the areas were parallel or perpendicular to each other, so I had to make each cut purposefully to avoid stupid mistakes and ugly gaps. For now, the flooring is simply laying in place, but with a few more hours of applying filler and sanding, I should be ready to use some adhesive and plaster it to the floor permanently. Then, conduits, then the drivers seat, then supply wiring..... etc.
</td></tr></table>
Since I keep a ready list of plausible excuses for not working on the bus much, I'll pull one out of the hat... and it reads: "Tell them I've been busy in all my "spare" time", looking for a new place to live.
<hr>
<table border="0" width="100%" bgcolor="#FFFFC0"><tr><td>A photo from two weeks back that I haven't had time to post:
<center> </center>
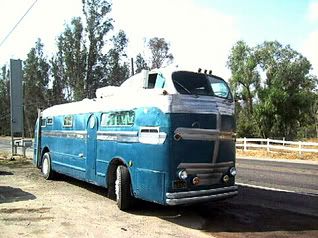
Since the bus is going to have to be taken out on the road when I move, I'll have to take it to get licensed. Although bumpers probably aren't legally required, I thought it would be a good idea to have them on for the trip.
The top outer sections needed to have some length cut off to clear the door opening. I still have to weld up some caps on the open ends where I removed the extra length to blend the bumpers into the door frame. This photo make it all look crooked and weird??
Eventually, I will need to replace the left lower curved section to get rid of the cutout in the bumper that the exhaust pipe used to exit from. I need to contact Patrick with the Wheelchair Project about getting a salvage bumper section off one of his Crowns.
</td></tr></table>
<hr>
<table border="0" width="100%" bgcolor="#FFFFC0"><tr><td>A photo from two weeks back that I haven't had time to post:
<center>
</center>Since the bus is going to have to be taken out on the road when I move, I'll have to take it to get licensed. Although bumpers probably aren't legally required, I thought it would be a good idea to have them on for the trip.
The top outer sections needed to have some length cut off to clear the door opening. I still have to weld up some caps on the open ends where I removed the extra length to blend the bumpers into the door frame. This photo make it all look crooked and weird??
Eventually, I will need to replace the left lower curved section to get rid of the cutout in the bumper that the exhaust pipe used to exit from. I need to contact Patrick with the Wheelchair Project about getting a salvage bumper section off one of his Crowns.
</td></tr></table>
Well, the short list is:
Crowded, noisy, stinky, rat-race city
Hot uncomfortable summers, freezing winters
Air quality problems caused by vehicles, pollen, field burning, industry, temperature inversion.
Outrageous property taxes
Pressure from development on surrounding properties
The long list is available here
Crowded, noisy, stinky, rat-race city
Hot uncomfortable summers, freezing winters
Air quality problems caused by vehicles, pollen, field burning, industry, temperature inversion.
Outrageous property taxes
Pressure from development on surrounding properties
The long list is available here
<table border="0" width="100%" bgcolor="#FFFFC0"><tr><td>Just a tiny bit of work on the bus last weekend. The rear of the bus has turn signals, tail lights, and stop lights, but I hadn't figured out what I was going to do to mount a license plate back there. While combing through some scrap steel in the sticker bushes, I came across a bumper guard from a 1957 Nash Rambler that had a license plate frame and lamp holder. A few minutes with some scouring powder and water and I had the chrome gleaming:
<center> </center>
The face of the bumper guards that contact the bus bumper needed some grinding to fit the contour, then I fabricated some 1" steel strap and made a pair of hangers that allow me to remove the unit from the bumper to make the access to the rear door easy and free, but allows the plate to be quickly hung and then secured with springs to the bottom of the bumper.
Nice touch, it reminds me strongly of a late 1940's/early 1950's Buick!
</td></tr></table>
<center>
</center>The face of the bumper guards that contact the bus bumper needed some grinding to fit the contour, then I fabricated some 1" steel strap and made a pair of hangers that allow me to remove the unit from the bumper to make the access to the rear door easy and free, but allows the plate to be quickly hung and then secured with springs to the bottom of the bumper.
Nice touch, it reminds me strongly of a late 1940's/early 1950's Buick!
</td></tr></table>
Whats that big hole in the left upper bumper????? I remember you asking me a few years ago about a new one without the hole. Been gone a few months, but I'm back!!! Will try and post some more pics and maybe some more useless info!!! Heres one of a friends GMC I think is a very rare bus!!! Infact, I think I already posted it here before. O well, here it is again.
Who is online
Users browsing this forum: No registered users and 10 guests