1935 Chevy school bus
Moderator: TMAX
-
Lostranger

- Posts: 335
- Joined: Fri May 14, 2010 2:49 am
- Location: North Carolina
- Contact:
Re: 1935 Chevy school bus
Loving your work as always, Jack. I've been teaching banjo building at Warren Wilson College 7 days a week for most of the past month. Might have time next week to do bus work. Keep up the good work. Jim
Re: 1935 Chevy school bus
Hey Jack --- I am SOOOOOOO jealous! Not of your bus...but of your skills. Really looking good bud! I am so far behind on my little project it is discouraging. That month in France was great but cost me over two months worth of working time on the Shorty. Hope to get going on the (shudder) engine/tranny install soon. Gotta felling it's gonna be a b-t-h. Have to yank the steering gear box off the frame before I can even think about trying to wedge the engine in. That will make moving it around a bear until I can figure out a complete new power steering system. Been told the 4x4 Toyota should be up to the task but I'm not so sure. If I could find a medium duty truck setup (Ross?) I think I'd be better off. And if I could find one to mount on the outside of the frame instead of inside...all the better. Hmmm...what is your Isuzu steering like?
Somehow dropping the old body onto a new rolling chassis sounds so much more appealing these days than when I started.
Somehow dropping the old body onto a new rolling chassis sounds so much more appealing these days than when I started.
Re: 1935 Chevy school bus
Hey Tango, it is easy as can be setting the body on a late frame---but---- it is anything but easy to fit the original chevy snout on that same frame because the late frames are so much wider up front. I spent about 60 days labor (really) getting the tilt front to fit and work and about the best I can say for it is it is done. You can tell it is a Chevy because of the bow tie but without that it probably looks more like a 1919 Reo or Diamond T than a chevy. I am certain that retaining your stock frame (and making the motor fit it) will result in your being better able to retain the stock look of your bus than I did.
The Isuzu power steering mounts on the outside of the frame and the steering wheel mount up was easy to do using the Isuzu column. Adapting the original Chevy steering wheel to the Isuzu column wouldn't be all that complicated and it is nice to have all the switches etc. ready to use on the colunm. The Isuzu column is mounted in a "channel iron" of which the hollow portion faces down. I found that by reversing the hollow portion so that it faced up made it childs play to hook the sector shaft to the gear--and added foot space as well. I'll look through my pics and see if I have any worth looking at.
Jack
I used 1/2" plate to mount the Isuzu steering box on the flame. I backed up the plate inside the frame with another 1/2" plate and then boxed the frame.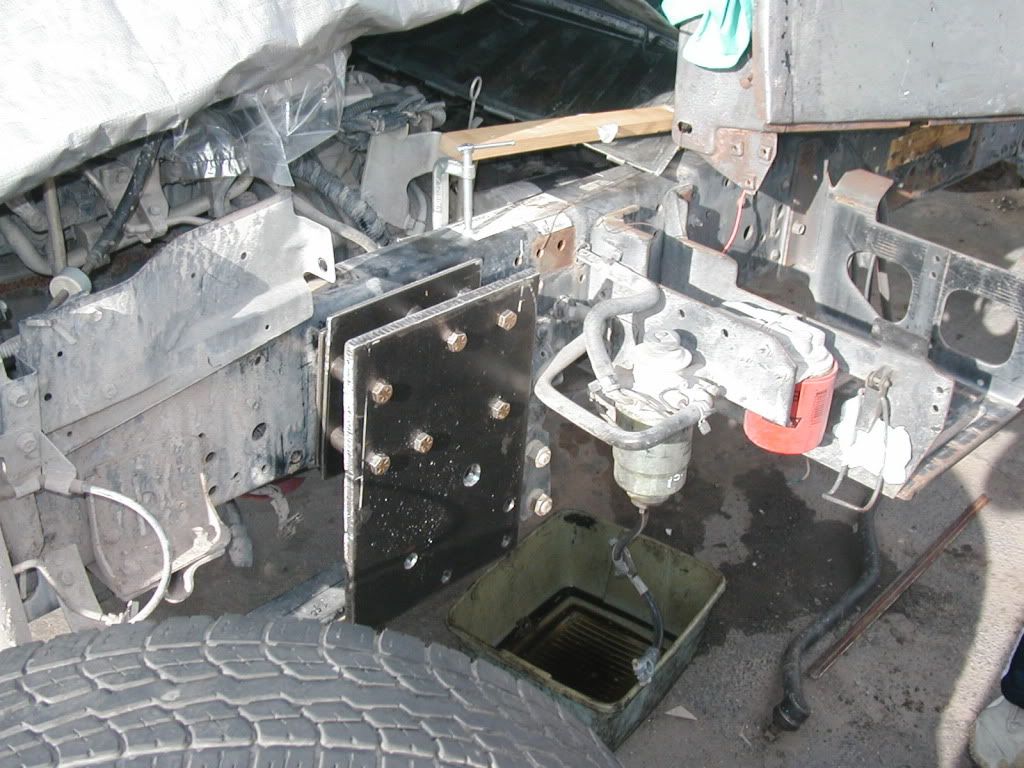
I used grade eight 1/2" bolts to attach the gear.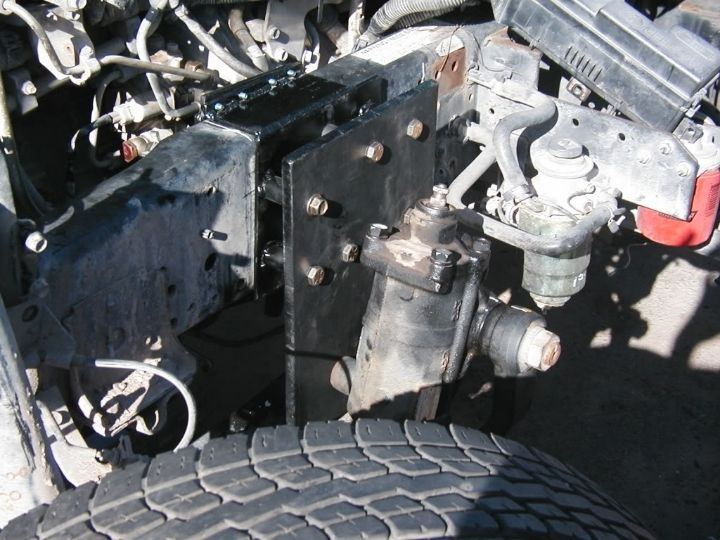
Steering sector shaft.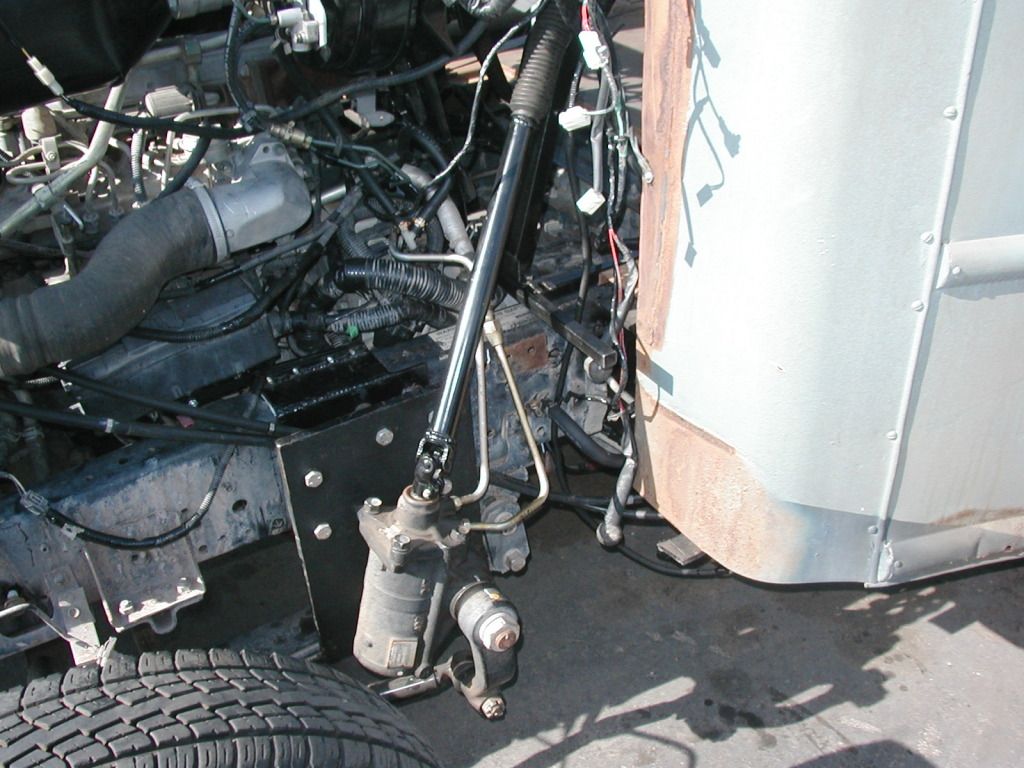
Isuzu steering column with "reversed" mount.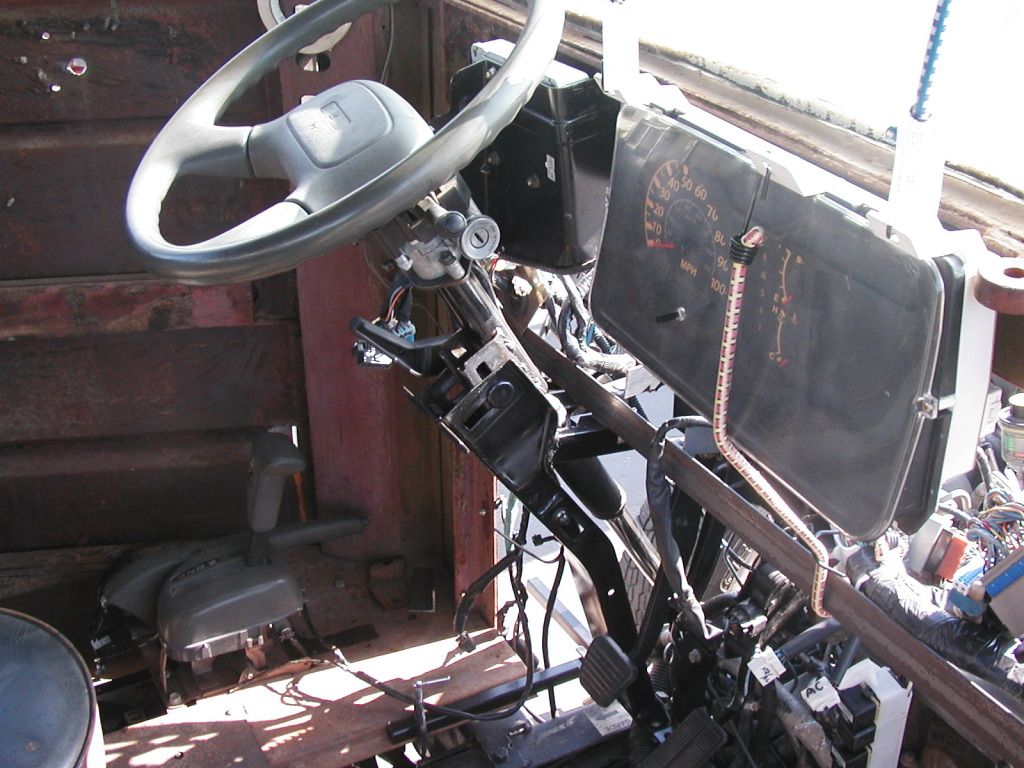
The Isuzu power steering mounts on the outside of the frame and the steering wheel mount up was easy to do using the Isuzu column. Adapting the original Chevy steering wheel to the Isuzu column wouldn't be all that complicated and it is nice to have all the switches etc. ready to use on the colunm. The Isuzu column is mounted in a "channel iron" of which the hollow portion faces down. I found that by reversing the hollow portion so that it faced up made it childs play to hook the sector shaft to the gear--and added foot space as well. I'll look through my pics and see if I have any worth looking at.
Jack
I used 1/2" plate to mount the Isuzu steering box on the flame. I backed up the plate inside the frame with another 1/2" plate and then boxed the frame.

I used grade eight 1/2" bolts to attach the gear.

Steering sector shaft.

Isuzu steering column with "reversed" mount.

Re: 1935 Chevy school bus
Hey Jack --- Many thanks. Your steering box looks exactly like what I've been looking for. What year/model is it?
And my chatter about a chassis swap was just that...chatter I could never hope to pull off the job you are doing. And I have a feelin that added snout is gonna look real dandy. My first search was for a 38-39 Diamond T. Love the look of those long nosed rascals!
And my chatter about a chassis swap was just that...chatter I could never hope to pull off the job you are doing. And I have a feelin that added snout is gonna look real dandy. My first search was for a 38-39 Diamond T. Love the look of those long nosed rascals!
Re: 1935 Chevy school bus
Hey Tango, Mine is a 2005 Chevy W3500 which is a clone of the Isuzu of the same year. I'd bet that the gear from any Isuzu NPR, gas or diesel, from about 1998 to the present would be more or less the same. Jack
Re: 1935 Chevy school bus
Thanks Again Jack --- that unit looks perfect for what I need to accomplish. The original gearbox is on the inside of the frame and there is no way the Cummins will fit around it so it's gotta go. And...this buggy really needs power steering which the Cummins is already set up for. I've been looking for a PS box that can be hung on the outside of the frame and that GM/Isuzu looks like a great fit. Being built for "Medium Duty" trucks it should be just about perfect for this rig.
One of the biggest problems I've been having is that "Modern" wrecking yard operators all seem to be bean-counters...not true junkers. In the "olden days" you could describe what you were looking for or trying to do and those guys could call out from memory dozens of parts that would work or cross reference and fill the bill and others that would come close. All they know now-a-days is what the computer says it came off of. "Application Specific". No clue what else it might fit, the rating, the dimensions, nadda. And half the time all they know is a number...not even what the freakin part IS!
I did manage to track down a list of vehicles that your PS is common to. For anyone else on a similar hunt...here is what I found...
GMC PS Gear box Chevy W3500 / Isuzu
1995 - 2008
Isuzu NPR & NQR & GMC W SERIES Trucks
___________________________________________________
Cardone (Rebuilt)
Power Steering Gear - A1 CARDONE
Part Number: 27-8704
___________________________________________________
Vehicles This Part Fits:
Make Model Year
Chevrolet Trucks - Medium Duty W3 Series 2008-2004
Chevrolet Trucks - Medium Duty W4 Series 2007-2004
Chevrolet Trucks - Medium Duty W5 Series 2007-2004
GMC Trucks - Medium Duty W3 Series 2008-2004
GMC Trucks - Medium Duty W4 Series 2008-2004
GMC Trucks - Medium Duty W5 Series 2007-2004
Isuzu Trucks - Medium/Heavy Duty NPR 2008-2008
2D Tilt Cab-Chassis and Gas
Isuzu Trucks - Medium/Heavy Duty NPR 2006-2004
Chassis-Forward Control w/Cab
Isuzu Trucks - Medium/Heavy Duty NPR 2007-2007
Chassis-Forward Control w/Cab and Gas
Isuzu Trucks - Medium/Heavy Duty NPR HD 2007-2004
Isuzu Trucks - Medium/Heavy Duty NQR 2007-2004
Isuzu Trucks - Medium/Heavy Duty NRR 2007-2005
Hope someone else finds this helpful. Thanks goes to Jack.
PS/Update...just found that gearbox and pitman arm for $200 bucks as a pullout and snagged it. BTW...New ones are a grand and rebuilt go for about $500 + a really steep core charge (another 3-400) making the new parts sound like a bargain!
Re: 1935 Chevy school bus
Hey Tango and all. Tango, you may want to snag the drag link to go along with the gear. The drag link has a couple of bends in it that make it perfect for clearing the LF wheel (you do have to cut and reverse the ends on the drag link but that sure beats trying to invent one yourself. I'll post pics if you wish).
I reported earilier that I'd figured out the fresh and grey water tanks which left the black and shower grey water tanks to complete. I've now finished those up. Because I sank the bathroom to create head room for my lanky 6'1" self, I had to build a grey water tank for the shower to drain into. This tank requires a pump to lift the water into the main grey water tank inside the bus. Yesterday at the local thrift store I found the perfect vessel for the shower grey water. It is a 6 gal water carboy and it fits under the bus between the diesel tank and the black tank just perfectly. I already had a 2gpm submergable pump so all I had to do was figure out how to get the pump into the carboy without any un-necesary cuting and I gotterdone.
Jack
Harking back to my PD/EMT days I designed a litter to support the black tank.
Otiginally the tank had beed strapped to the chassis of a 5er using steel ratchit straps. The straps were outboard of the frame rails and eventually caused the tank to split. I repaired the split and supported the tank fully along both sides--hopefully this will keep the tank from splitting again.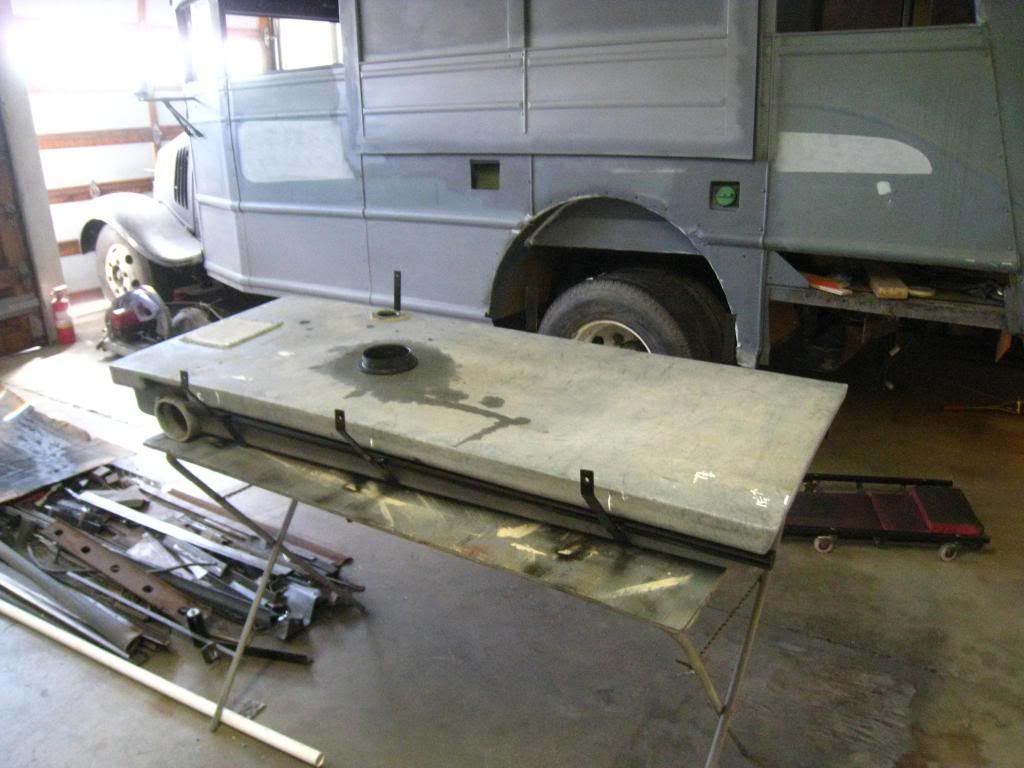
This is a pic of the shower tank just before I installed the pump. I soldered single strand bell wire to the pump wires and used them to pull the pump wires into and out of the tank, I stuffed a rubber hose into the output tube of the pump and used it to pull the pump outlet into and then out of the tank.
Pump and wires entering the tank.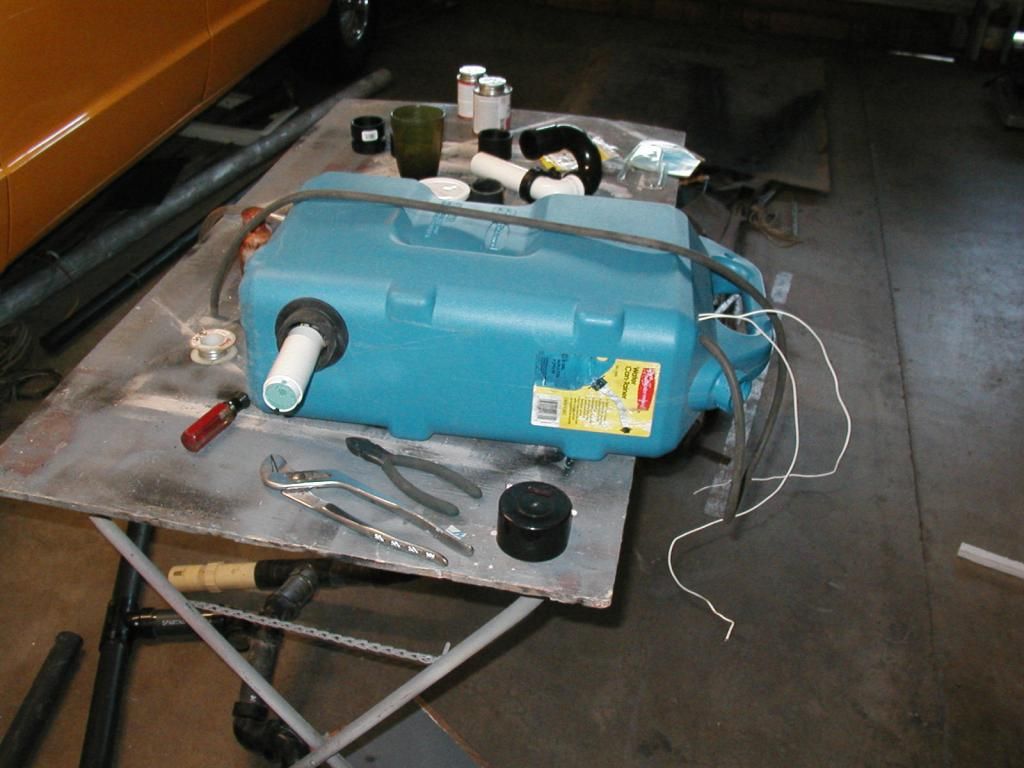
Pump and wires in their final position. The tank is now ready to install.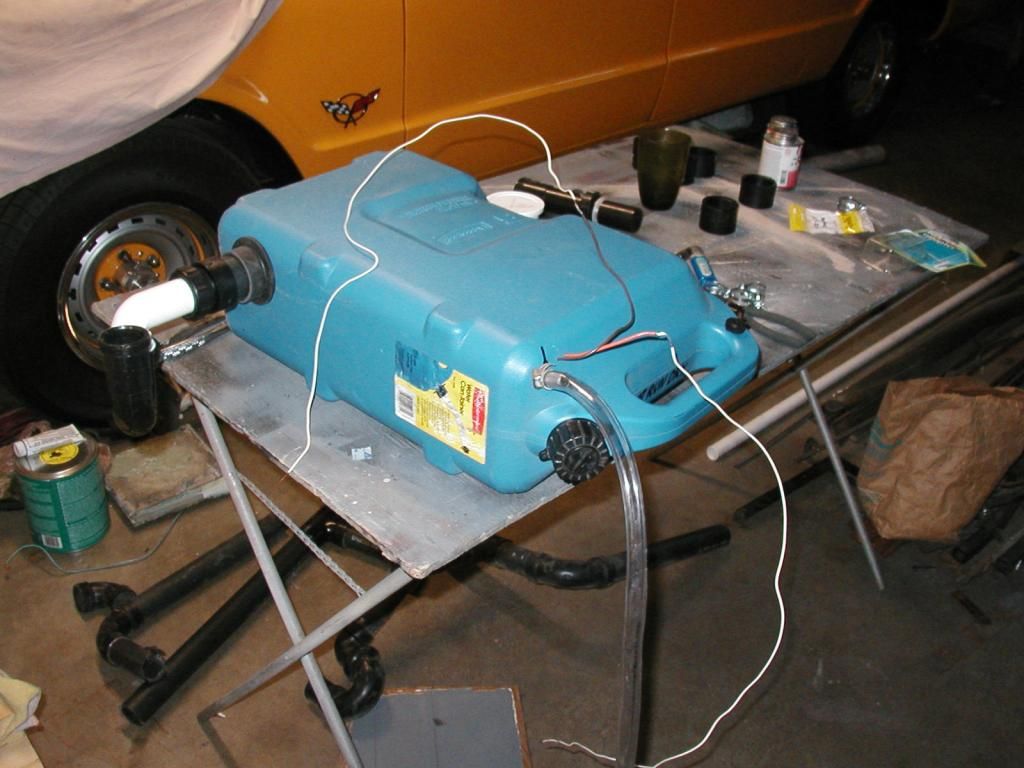
I reported earilier that I'd figured out the fresh and grey water tanks which left the black and shower grey water tanks to complete. I've now finished those up. Because I sank the bathroom to create head room for my lanky 6'1" self, I had to build a grey water tank for the shower to drain into. This tank requires a pump to lift the water into the main grey water tank inside the bus. Yesterday at the local thrift store I found the perfect vessel for the shower grey water. It is a 6 gal water carboy and it fits under the bus between the diesel tank and the black tank just perfectly. I already had a 2gpm submergable pump so all I had to do was figure out how to get the pump into the carboy without any un-necesary cuting and I gotterdone.
Jack
Harking back to my PD/EMT days I designed a litter to support the black tank.

Otiginally the tank had beed strapped to the chassis of a 5er using steel ratchit straps. The straps were outboard of the frame rails and eventually caused the tank to split. I repaired the split and supported the tank fully along both sides--hopefully this will keep the tank from splitting again.

This is a pic of the shower tank just before I installed the pump. I soldered single strand bell wire to the pump wires and used them to pull the pump wires into and out of the tank, I stuffed a rubber hose into the output tube of the pump and used it to pull the pump outlet into and then out of the tank.

Pump and wires entering the tank.

Pump and wires in their final position. The tank is now ready to install.

Re: 1935 Chevy school bus
Off the Shelf??? We don't need no stinkin "off the shelf!"
Yet another piece of masterful ingeneering! (Not misspelled... just a composite of "ingenious" & "engineering")
And yes...I'd love to see how you arranged your drag link. Mine will no doubt wind up quite a bit longer and with some serious kinks around stuff but I do plan on starting with the stocker. And I may go back for the column & wheel as well.
Re: 1935 Chevy school bus
Tango. I don't know where your drag link hooks up on your bus. Mine hooks up in front of the king pin. Jack
Left front wheel in full left turn position. The drag link easily clears the wheel.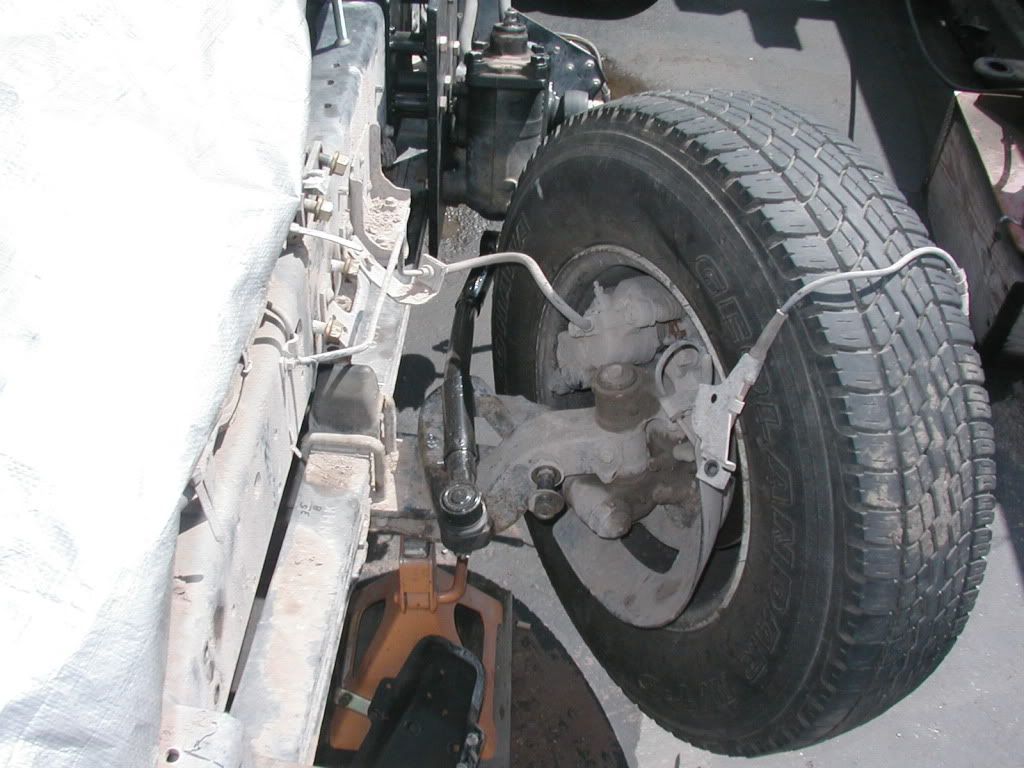 ]/b]
]/b]
Left front wheel in straight position as viewed from the rear.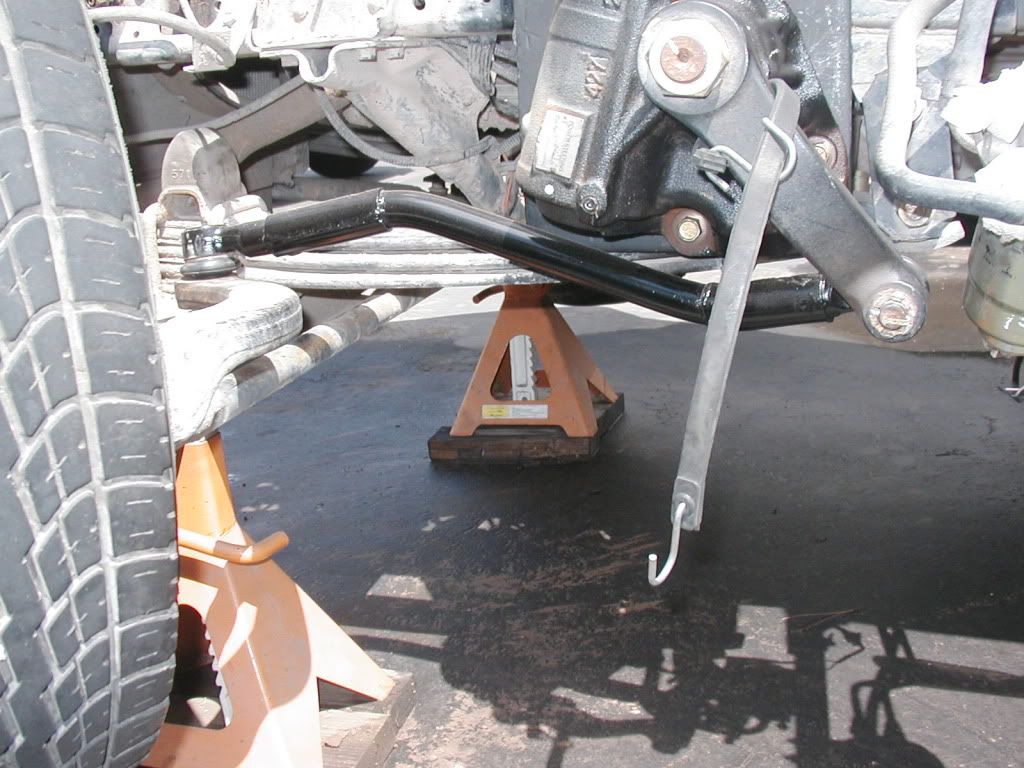
Left front wheel in full left turn position. The drag link easily clears the wheel.
 ]/b]
]/b]Left front wheel in straight position as viewed from the rear.

Re: 1935 Chevy school bus
Thanks Again Jack --- that looks pretty much like what I have been picturing as necessary for my rig. I'd planned on adapting the front connection from my original link to whatever I wound up using at the pitman end along with as many kinks and bends as were necessary to clear the wheel and other such inconveniences. I am still considering using a two-ton front axle I found but it hooks up very differently than the 1.5T. At some point I gotta decide which one to go with and that will depend on the availability of a disc brake adapter that may or may not come together. We'll see.
Onward!
Onward!
Re: 1935 Chevy school bus
Hello All. I managed to get the grey water tank for the shower installed today. It looked easy to install and it looks easy now that it is installed but my back is KILLING ME from rolling around on the concrete all day doing this EASY job  Oh well, I'm heading for a nice hot shower where I'll probably dream up some more fun for tomorrow! Jack
Here is a pic of the little grey water tank for the shower after installation.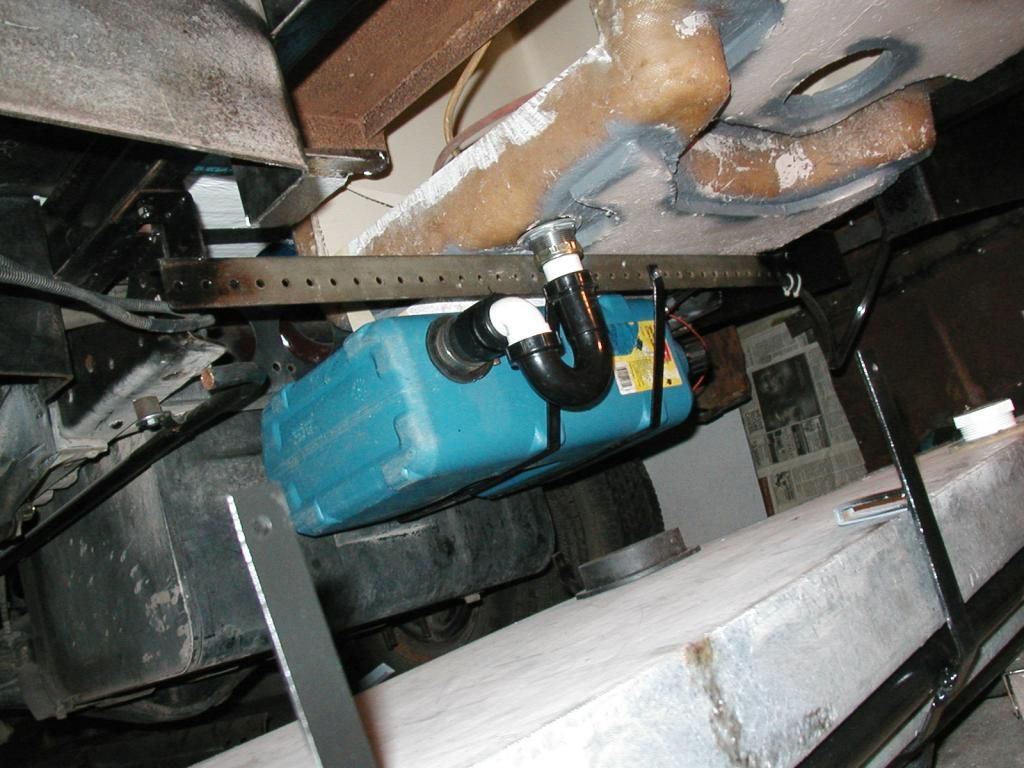
Here is a pic of the little grey water tank for the shower after installation.

-
Dennis The Bus Dweller

- Seasoned Nomadicista
- Posts: 1890
- Joined: Mon Nov 15, 2004 9:33 am
- Location: Southold N.Y.
- Contact:
Re: 1935 Chevy school bus
Hello All--and thanks Dennis for the kind words. Per usual I am continuing my hop scotch approach to building my bus. I've been working on holding tanks and it would seem reasonable for me to continue with the bath and sinks and stuff but I found I couldnt because the tail lamps,house A/C, rear vents, rear roof and sidewall insulation and the on demand water heater would be impossible to do as the bath would block all.  I've decided to work on the insulation and the water heater first.
Since I don't want a bunch of vents on the roof, I'll make use of the two rear windows that flank the rear door as vent sites for the tanks and hot water heater. I plan to use louvered heater grates in place of the windows and vent behind them. I'll build a steel surround for the water heater which will allow combustion air to come only from the outside and exhaust gasses to be directed to the outside via the grate. That plan led to the question of how hot the exhaust would be and what sealers and paint would survive that heat. I will be using an Ecotemp L5 heater (1.4gpm) which I will adjust to 1 gpm flow at 120 degrees F. I set up a mock-up of those requirements and did some temp measurements.
This pic will give you an idea where the grates will go.
Mocked-up water heater up and running.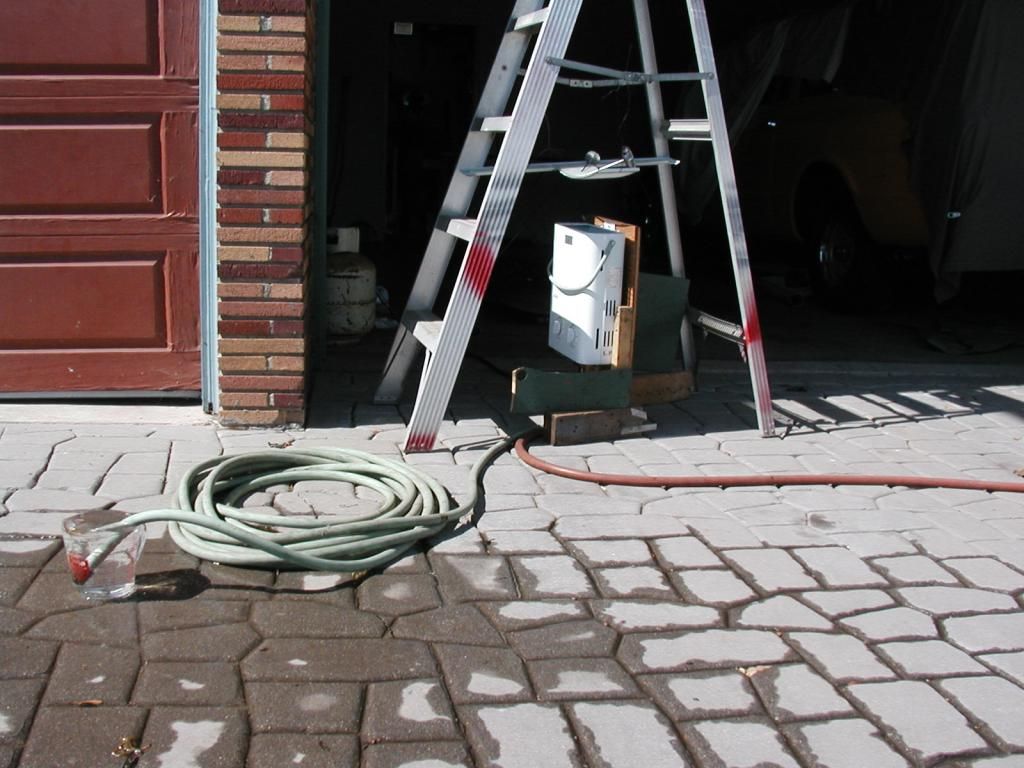
The inlet water temp was 30 degrees F and the output water temp was 120 degrees F.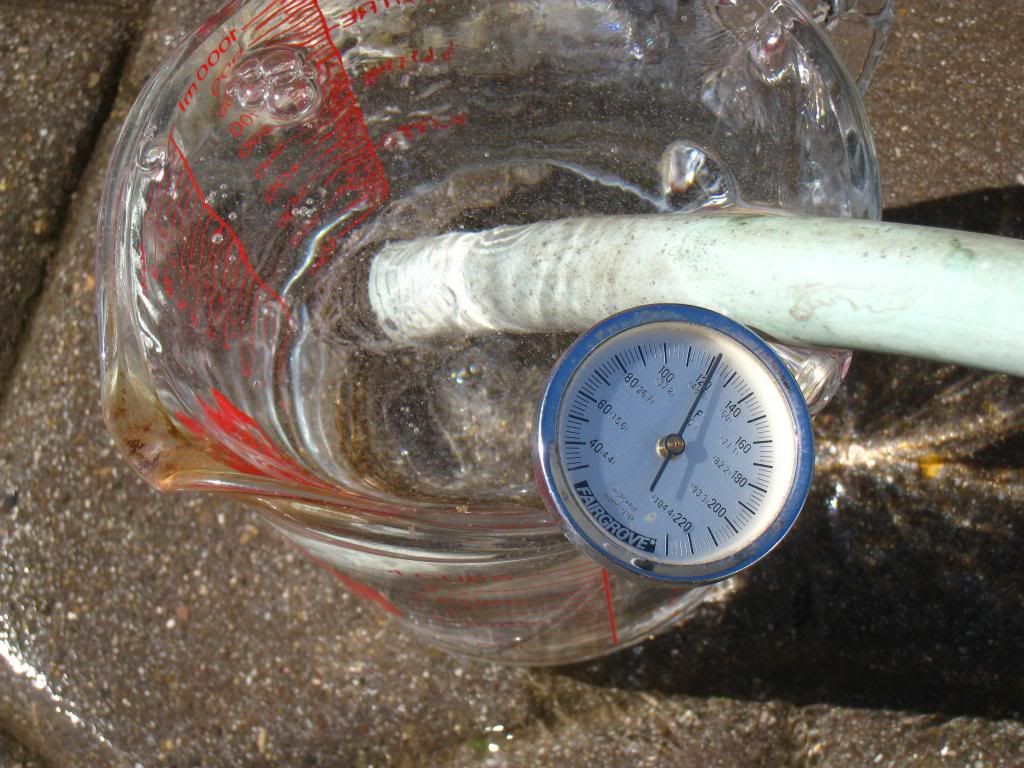
The exhaust temp was 195 degrees F measured 7" from the core. The white louver is what will become the grate although the grate will be another 7" further away from the core. I could detect no ill effect to the finish of the grate after an hours operation so I think It will hold up.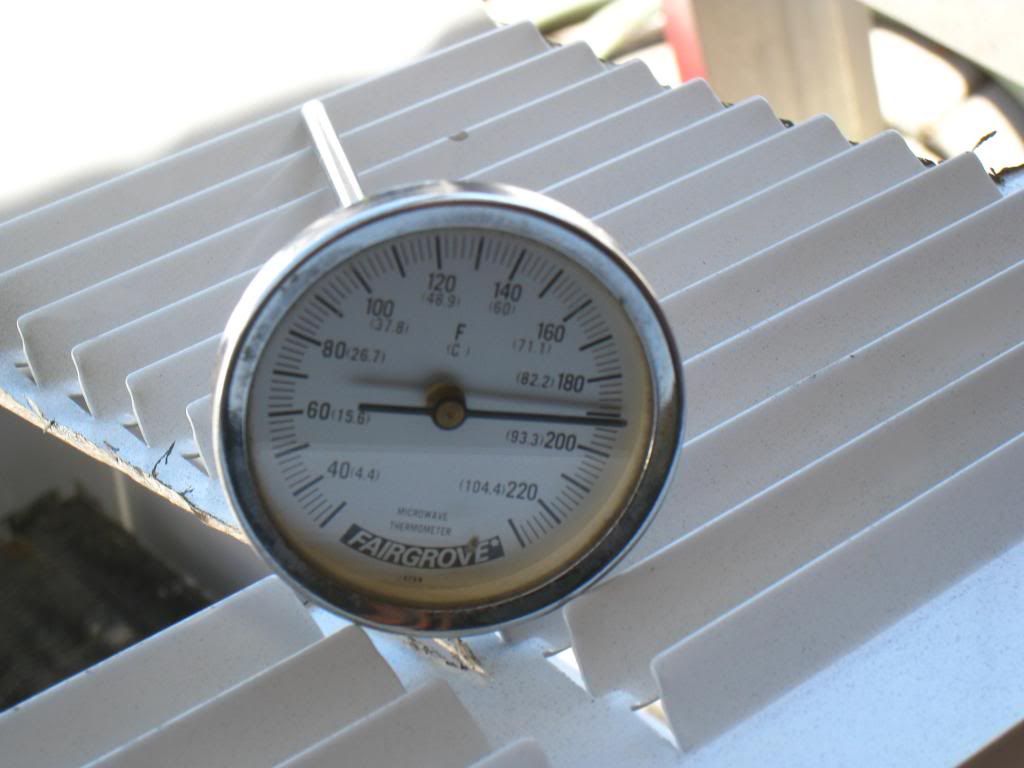
I lowered the louver to the top of the core and added a bit of cured Silkaflex 220 plus sealer to see how they behaved. After another hours operation I could see no effect on either the grate or the sealer.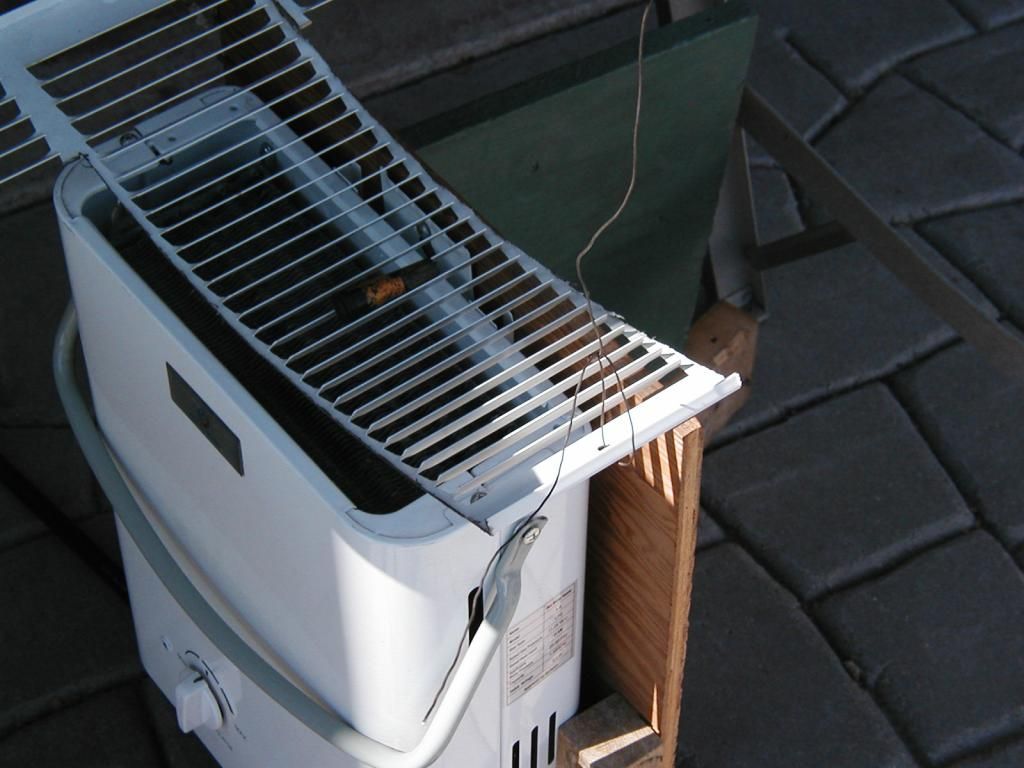
Tomorrow I will trim the grates to fit the window and begin fabricating the sheet metal covers. As Tango would say "Onward". Jack
Since I don't want a bunch of vents on the roof, I'll make use of the two rear windows that flank the rear door as vent sites for the tanks and hot water heater. I plan to use louvered heater grates in place of the windows and vent behind them. I'll build a steel surround for the water heater which will allow combustion air to come only from the outside and exhaust gasses to be directed to the outside via the grate. That plan led to the question of how hot the exhaust would be and what sealers and paint would survive that heat. I will be using an Ecotemp L5 heater (1.4gpm) which I will adjust to 1 gpm flow at 120 degrees F. I set up a mock-up of those requirements and did some temp measurements.
This pic will give you an idea where the grates will go.

Mocked-up water heater up and running.

The inlet water temp was 30 degrees F and the output water temp was 120 degrees F.

The exhaust temp was 195 degrees F measured 7" from the core. The white louver is what will become the grate although the grate will be another 7" further away from the core. I could detect no ill effect to the finish of the grate after an hours operation so I think It will hold up.

I lowered the louver to the top of the core and added a bit of cured Silkaflex 220 plus sealer to see how they behaved. After another hours operation I could see no effect on either the grate or the sealer.

Tomorrow I will trim the grates to fit the window and begin fabricating the sheet metal covers. As Tango would say "Onward". Jack
-
Dennis The Bus Dweller
- Seasoned Nomadicista
- Posts: 1890
- Joined: Mon Nov 15, 2004 9:33 am
- Location: Southold N.Y.
- Contact:
Re: 1935 Chevy school bus
Those are great little water heaters, I just got the next size up for my Tiny house but I have one of these in my solar trailer 
Last edited by Dennis The Bus Dweller on Thu Oct 17, 2013 9:06 am, edited 1 time in total.
Peace along the way
Dennis the bus dweller N.Y.
Dennis the bus dweller N.Y.
Re: 1935 Chevy school bus
Hey Jack --- Will the L5 be hung outdoors or mounted inside? If inside, how are you addressing venting it? I ask because I've been looking at the Ecotemp FVI-12 which comes with a power vent but is bigger and costs about $150 bucks more.
Who is online
Users browsing this forum: Bing [Bot] and 24 guests