1935 Chevy school bus
Moderator: TMAX
Re: 1935 Chevy school bus
Looking good Jack! --- And no doubt you also have some trick for making all the styro-crumbs disappear. What's your technique...shop vac...static wand...or just teleport it into that other dimension where all lost socks go?
Re: 1935 Chevy school bus
It would be environmentally wrong to waste all those beads and use literally watts of electricity to vacuum them up. The environmentally responsible bus converter should lay the floor insulation right over it. All those beads should save a hundredth of a watt a decade at least.tango wrote:Looking good Jack! --- And no doubt you also have some trick for making all the styro-crumbs disappear. What's your technique...shop vac...static wand...or just teleport it into that other dimension where all lost socks go?
-
Lostranger

- Posts: 335
- Joined: Fri May 14, 2010 2:49 am
- Location: North Carolina
- Contact:
Re: 1935 Chevy school bus
Jack, your passing comment about spray foam caused me to do a Homer Simpson. "DOH!" McMaster Carr has a 30# DIY kit for $435. That's 17 cubic feet of 1.8lb/cf foam. I have no idea how far that would go, but even two of those would be less than what I was figuring to spend on polyiso board. From what I'm seeing on YouTube, it would be a HUGE time saver, plus, it gets all the cracks and corners. I'd have to wait until after the reskin next spring, but i'm thinking spray is the way. Anyone have experience with the stuff?
Re: 1935 Chevy school bus
Hello All. Lostranger that looks like a good find and besides doing a better job it would be more fun than the cut and paste board technique. I'm so far along now that I guess I am committed (or I should be committed  ) to the boards and back filling with Great Stuff.
Tango and Roach711, I've had two ideas as to what I should do with all those little plastic beads:
1) I could sweep the stuff up, toss it in some white paint and sell it as a roof coating Well it might work
2) Better yet I'll buy a gross of fresh cooked donuts and invite my cop buddies over for coffee and powder sugar donuts--you dip style--there wouldn't be a crumb left! Bet I'll hear about that one Ha!
Jack
Tango and Roach711, I've had two ideas as to what I should do with all those little plastic beads:
1) I could sweep the stuff up, toss it in some white paint and sell it as a roof coating
2) Better yet I'll buy a gross of fresh cooked donuts and invite my cop buddies over for coffee and powder sugar donuts--you dip style--there wouldn't be a crumb left!
Jack
Re: 1935 Chevy school bus
Hey Jack --- if yer only gonna buy a single gross of donuts, better limit the in-vi-tees to 2 or 3 at most bud! 
-
stuartcnz

- Site Admin
- Posts: 887
- Joined: Fri Dec 19, 2008 8:05 pm
- Location: Aotearoa, New Zealand
- Contact:
Re: 1935 Chevy school bus
Dennisthebusdweller is the man to ask about foam. Here is a picture from inside his bus, during conversion.Lostranger wrote:Jack, your passing comment about spray foam caused me to do a Homer Simpson. "DOH!" McMaster Carr has a 30# DIY kit for $435. That's 17 cubic feet of 1.8lb/cf foam. I have no idea how far that would go, but even two of those would be less than what I was figuring to spend on polyiso board. From what I'm seeing on YouTube, it would be a HUGE time saver, plus, it gets all the cracks and corners. I'd have to wait until after the reskin next spring, but i'm thinking spray is the way. Anyone have experience with the stuff?

https://stuartcrawfordmedia.com/
https://nomadichome.org/
https://ethicallogistics.com/ Challenging the way you think.
JID:stuart@nomadicista.nz
https://nomadichome.org/
https://ethicallogistics.com/ Challenging the way you think.
JID:stuart@nomadicista.nz
Re: 1935 Chevy school bus
Thanks Stuart--now I know where they got the term "man cave". I'm almost afraid to ask Dennis how much work that was to smooth out. Still, it didn't miss any nooks or crannies like the board insulation does. Jack
Re: 1935 Chevy school bus
Speaking of "Little Plastic Beads"...whoa! I watched a crew insulating a high-dollar rig using spray foam several years ago. Very impressive coverage. But between the overspray and the large grinders with wire wheels they used to take down the excess...I have never seen a bigger mess in my life! Every bit of the styro-dust was so charged statically that even their giant, shop sized commercial vacuum wouldn't pull it off everything.
I know the stuff works like gangbusters but doubt I could deal with the processes involved. Guess I'll just have to postpone that trip to Little America.
Of course the answer to the mess is...just pay someone else to do it. But then I couldn't afford the fuel to drive all the way to Antarctica. Dang. If it isn't one thing it's another.
-
Stealth Camper
- Posts: 855
- Joined: Fri Apr 09, 2010 5:17 pm
- Location: Oklahoma
- Contact:
Re: 1935 Chevy school bus
A few years ago a friend did that to his house remodel. I watched/helped a little bit, and for the 'smoothing' he had a long bladed saw that looked like a very long hacksaw blade, about 1.5" wide and 3 feet long. Bridged the studs starting at the top, and 'sawed' his way down. No grinding! Some 'dust', but mostly chunks of foam, some fairly good size, and almost easy to handle. I figured I would do the same to my bus when I get to that point....and maybe even the house if do a major re-work.
It seals cracks so well, I think it would be worth a lot of hassle, but his experience wasn't too bad - no where near as bad as fiberglass bat insulation! I hate that itchy stuff!!
It seals cracks so well, I think it would be worth a lot of hassle, but his experience wasn't too bad - no where near as bad as fiberglass bat insulation! I hate that itchy stuff!!
Re: 1935 Chevy school bus
Sorry I haven't been following posts for a while. Don't shoot.ol trunt wrote: . . .
Another topic: I made up a "hall way switch " set up for thr recirculating hot water system so that it could be controlled at either the bath or kitchen--that works fine. I incorporated a couple of LED lamps as guide lamps so that one would know either in the kitchen or the bath that the solenoid shunt (back to the water tank) was on. The guide lamps were rated for 12 volts (AC or DC who knows) and came with built in resistors etc. They worked fine for a day and then both gave up the ghost. I am aware that you can screw up LEDs by reversing polarity--but I didn"t do that---unless---. I noticed while checking the voltage on the solenoid that when you cut power to the solenoid, the voltage measured shows a progression to zero. That doesn't happen with say a DC motor or lamp--the voltage just stops. Is it possible that the solenoid is acting like a capacitor and storing energy which is released when the solenoid goes to rest? If so, could this energy look to the LED like reversed polarity thereby causing LED failure????? I posed this question to the guys at the local Fry's Electronics where I bought the LEDs and got my favorite response--deer in the headlamps. anyone have a thought on this? Thanks, Jack
Seeing the voltage dissipate slowly instead of stopping sure looks like a capacitor in either the switching or across the solenoid. But what might be frying the LEDs is a voltage spike from the magnetic field collapsing in the solenoid.
It is standard practice with designing solid-state relay or solenoid drivers, whether transistors or chips, to put a regular 'protection' power diode backwards across the coil of the relay or solenoid. By backwards, I mean the marked end points toward positive so that no current normally flows. Every electrical current creates a magnetic field, and this magnetism is put to use in a relay or solenoid by pulling on a moving switch contact or valve piece.
When you open the circuit and remove the current, the magnetic field collapses. This creates a sudden current spike. Think of how an ignition coil harnesses that sudden spike by coupling it magnetically to the high voltage secondary when the points open.
Anyway, based on how the protection diodes are installed, the spike must be the reverse of the current flow when the power is applied. The current is supposed to flow negative to positive through the diode (in the diode's proper direction) and be shorted out across the coil, to protect the solid state switching devices. The diode shouldn't be needed with a purely mechanical switch, but you are introducing a solid-state indicator across the coil.
See if putting a power supply diode across the positive and negative leads at the solenoid saves your LEDs.
Also, check the LEDs ratings. All LEDs need some form of current limiting to survive. The simplest is a series resistor to limit the amount of current from a known voltage or voltage range. If the LED is rated for 100% current at 12.00 volts DC because of the resistor choice, it might be overstressed at 14-15 volts from a charger or alternator. Don't laugh, this should be a no-brainer, but I have seen expensive commercial equipment designed for "12 volts" that cooked its power supply at 14 volts, because the power regulator was poorly designed for use in a mobile radio environment . . . . .
Re: 1935 Chevy school bus
Hello All. Redbear, thanks for the very clear response. I suspect you are right about the coil effect and your idea as to how to lick the problem makes perfect sense. I'm still puzzled as to why the mfg can't tell me if he means 12 v DC or AC or both???? I did find some pretty little blue 12 v dc grain of wheat lamps that I know will work rather than the LEDs--still I'd rather have used LEDs I guess.
I've spent most of the week installing sheets of foam insulation in the roof of my bus. I finally have the entire roof completed and the inner steel headliner in place. I used Great Stuff to fill in the voids along the edges of the foam board and while it does what it is susposed to do it wasn't much fun. I discovered that if the can is cold (50 degrees F) no workie. That required the use of a hot water bath to keep the juices flowing. Next I discovered that "frothing" doesn't happen when you spray the stuff at cold temps--at least not until you have given up waiting. But then watch out!!! The stuff nearly explodes out of all the little openings and cracks. I'd decided to leave the bus and return to check after lunch. Just as I stepped in under the roof, the foam let go and globbed a wad into my hair--oh s---! I'm now sporting a VERY short hair cut (think Caddy Shack)
Actually, cleaning up the cured foam isn't all that bad. I used a hand held hacksaw blade and trimmed away the excess froth to develop the proper contours. Still, I think the word Great in Great Stuff probably should have been OK as in OK Stuff
It looks like I'll start the fiberglass repair on the shower next. We'll see.
Jack
Two inches of foam board over the pop out.
More foam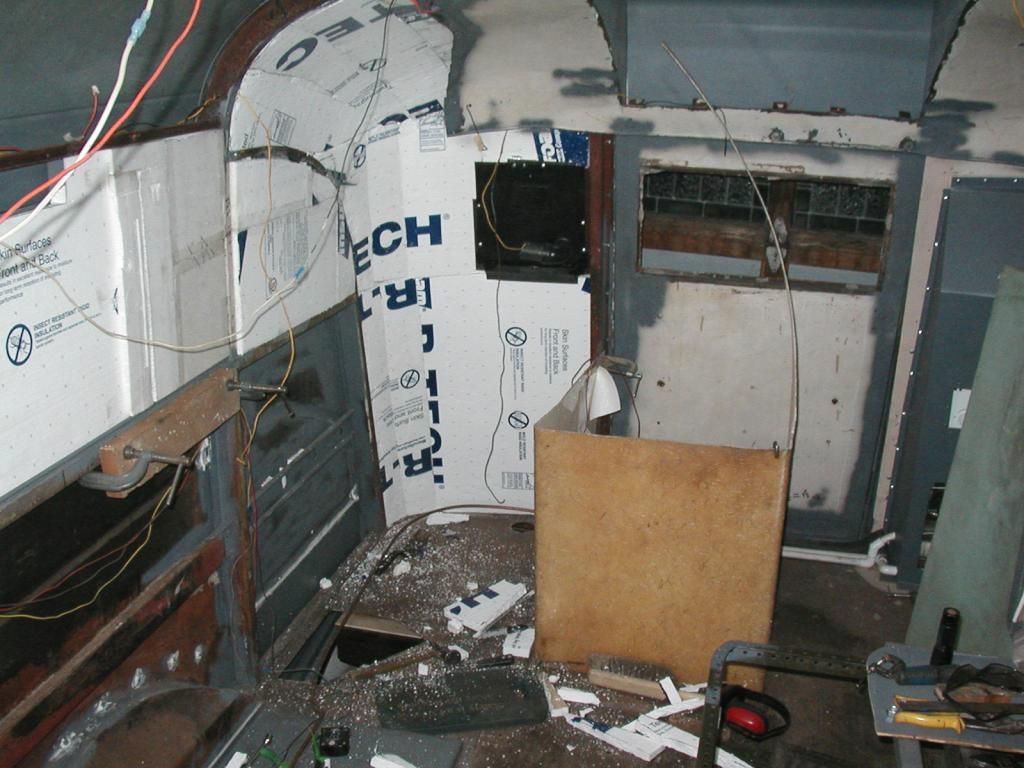
Front of bus.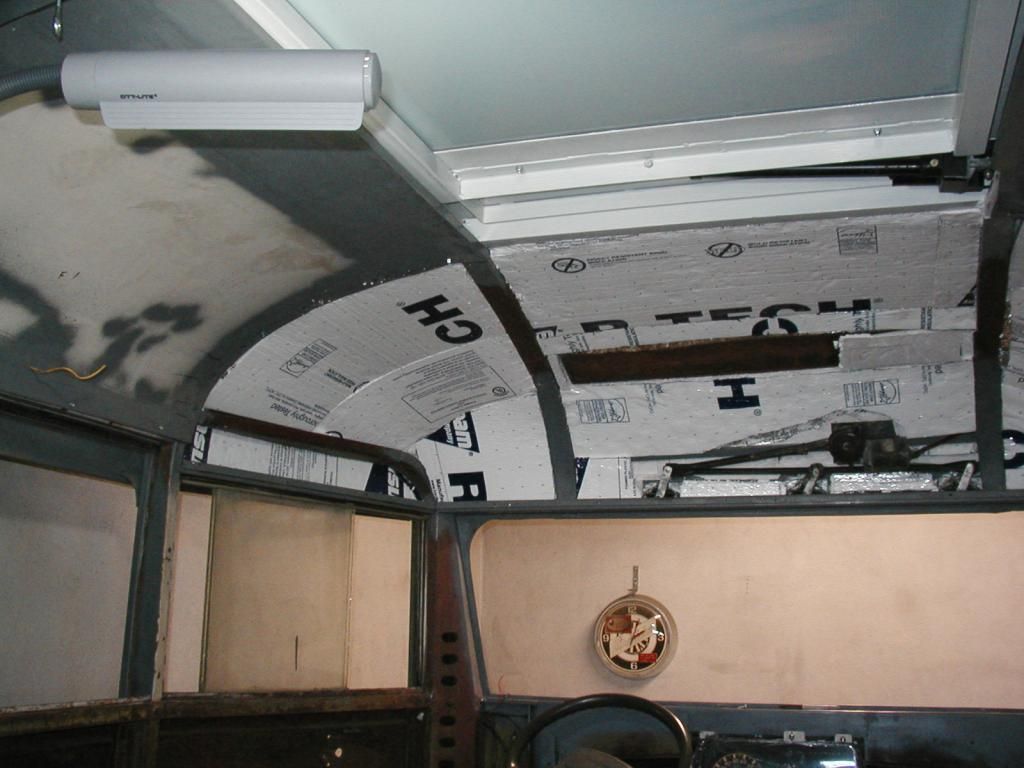
Again.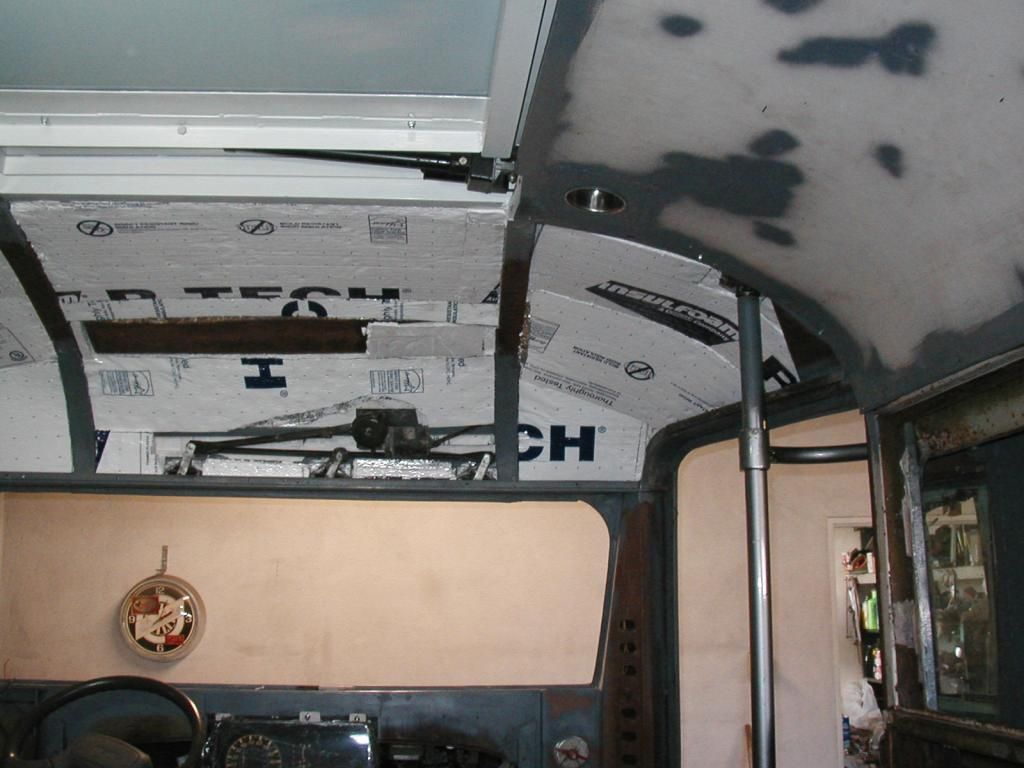
I ended up using 3 inches of foam over the front driving area as there was ALMOST enough room. The result was that I had to use my port-o-power to compress the foam a bit so that I could install the front inner sheet metal. I'll be paying for that clever idea in sore muscles.
I found some unused framing in the area just above the drivers window. Perhaps this was designed in for european delivery as the section was an unused mirror of the top of the right hand door. I turned the recess into a "glove box" as there isn't one in the dash.
I've spent most of the week installing sheets of foam insulation in the roof of my bus. I finally have the entire roof completed and the inner steel headliner in place. I used Great Stuff to fill in the voids along the edges of the foam board and while it does what it is susposed to do it wasn't much fun. I discovered that if the can is cold (50 degrees F) no workie. That required the use of a hot water bath to keep the juices flowing. Next I discovered that "frothing" doesn't happen when you spray the stuff at cold temps--at least not until you have given up waiting. But then watch out!!! The stuff nearly explodes out of all the little openings and cracks. I'd decided to leave the bus and return to check after lunch. Just as I stepped in under the roof, the foam let go and globbed a wad into my hair--oh s---! I'm now sporting a VERY short hair cut (think Caddy Shack)
Actually, cleaning up the cured foam isn't all that bad. I used a hand held hacksaw blade and trimmed away the excess froth to develop the proper contours. Still, I think the word Great in Great Stuff probably should have been OK as in OK Stuff
It looks like I'll start the fiberglass repair on the shower next. We'll see.
Jack
Two inches of foam board over the pop out.

More foam

Front of bus.

Again.

I ended up using 3 inches of foam over the front driving area as there was ALMOST enough room. The result was that I had to use my port-o-power to compress the foam a bit so that I could install the front inner sheet metal. I'll be paying for that clever idea in sore muscles.

I found some unused framing in the area just above the drivers window. Perhaps this was designed in for european delivery as the section was an unused mirror of the top of the right hand door. I turned the recess into a "glove box" as there isn't one in the dash.

-
Lostranger
- Posts: 335
- Joined: Fri May 14, 2010 2:49 am
- Location: North Carolina
- Contact:
Re: 1935 Chevy school bus
Love your progress, Jack. After the stove marathon, I'm not doing much on my bus this week. I have a couple of banjos I have to get out. After that, I'll be doing insulation in several places. I'm taking Dusty's advice and putting bubble wrap on some windows. Most of my windows are blanked, and that process includes a sheet of polyiso board over the glass, painted black on the outside. With the dark tint, you can't tell what's going on with these windows from the outside, even in bright sun.
Glad your bus is coming along. I'm thinking through the possibility of heading to the southwest next winter to work some craft shows and music festivals. If we ever get anywhere close, I'd love to see your work in person.
Be well and more power to you.
Jim
Glad your bus is coming along. I'm thinking through the possibility of heading to the southwest next winter to work some craft shows and music festivals. If we ever get anywhere close, I'd love to see your work in person.
Be well and more power to you.
Jim
Re: 1935 Chevy school bus
Hey Jim. We'd love to have you--just let us know when. We are about 30 miles south of Santa Barbara and about 60 miles north of LA right on the coast in Oxnard. There are several camp grounds and rv parks near by and the weather is always cool. Jack
-
somewhereinusa

- Posts: 324
- Joined: Sat Feb 12, 2011 2:44 pm
- Location: Andrews, Indiana
- Contact:
Re: 1935 Chevy school bus
Hey Jack,I'm still puzzled as to why the mfg can't tell me if he means 12 v DC or AC or both????
I'm pretty sure there aren't any AC LED's they only pass current one way. If you apply AC it would be turning off and on 60 times a second.
Who is online
Users browsing this forum: No registered users and 6 guests